| Introduction |
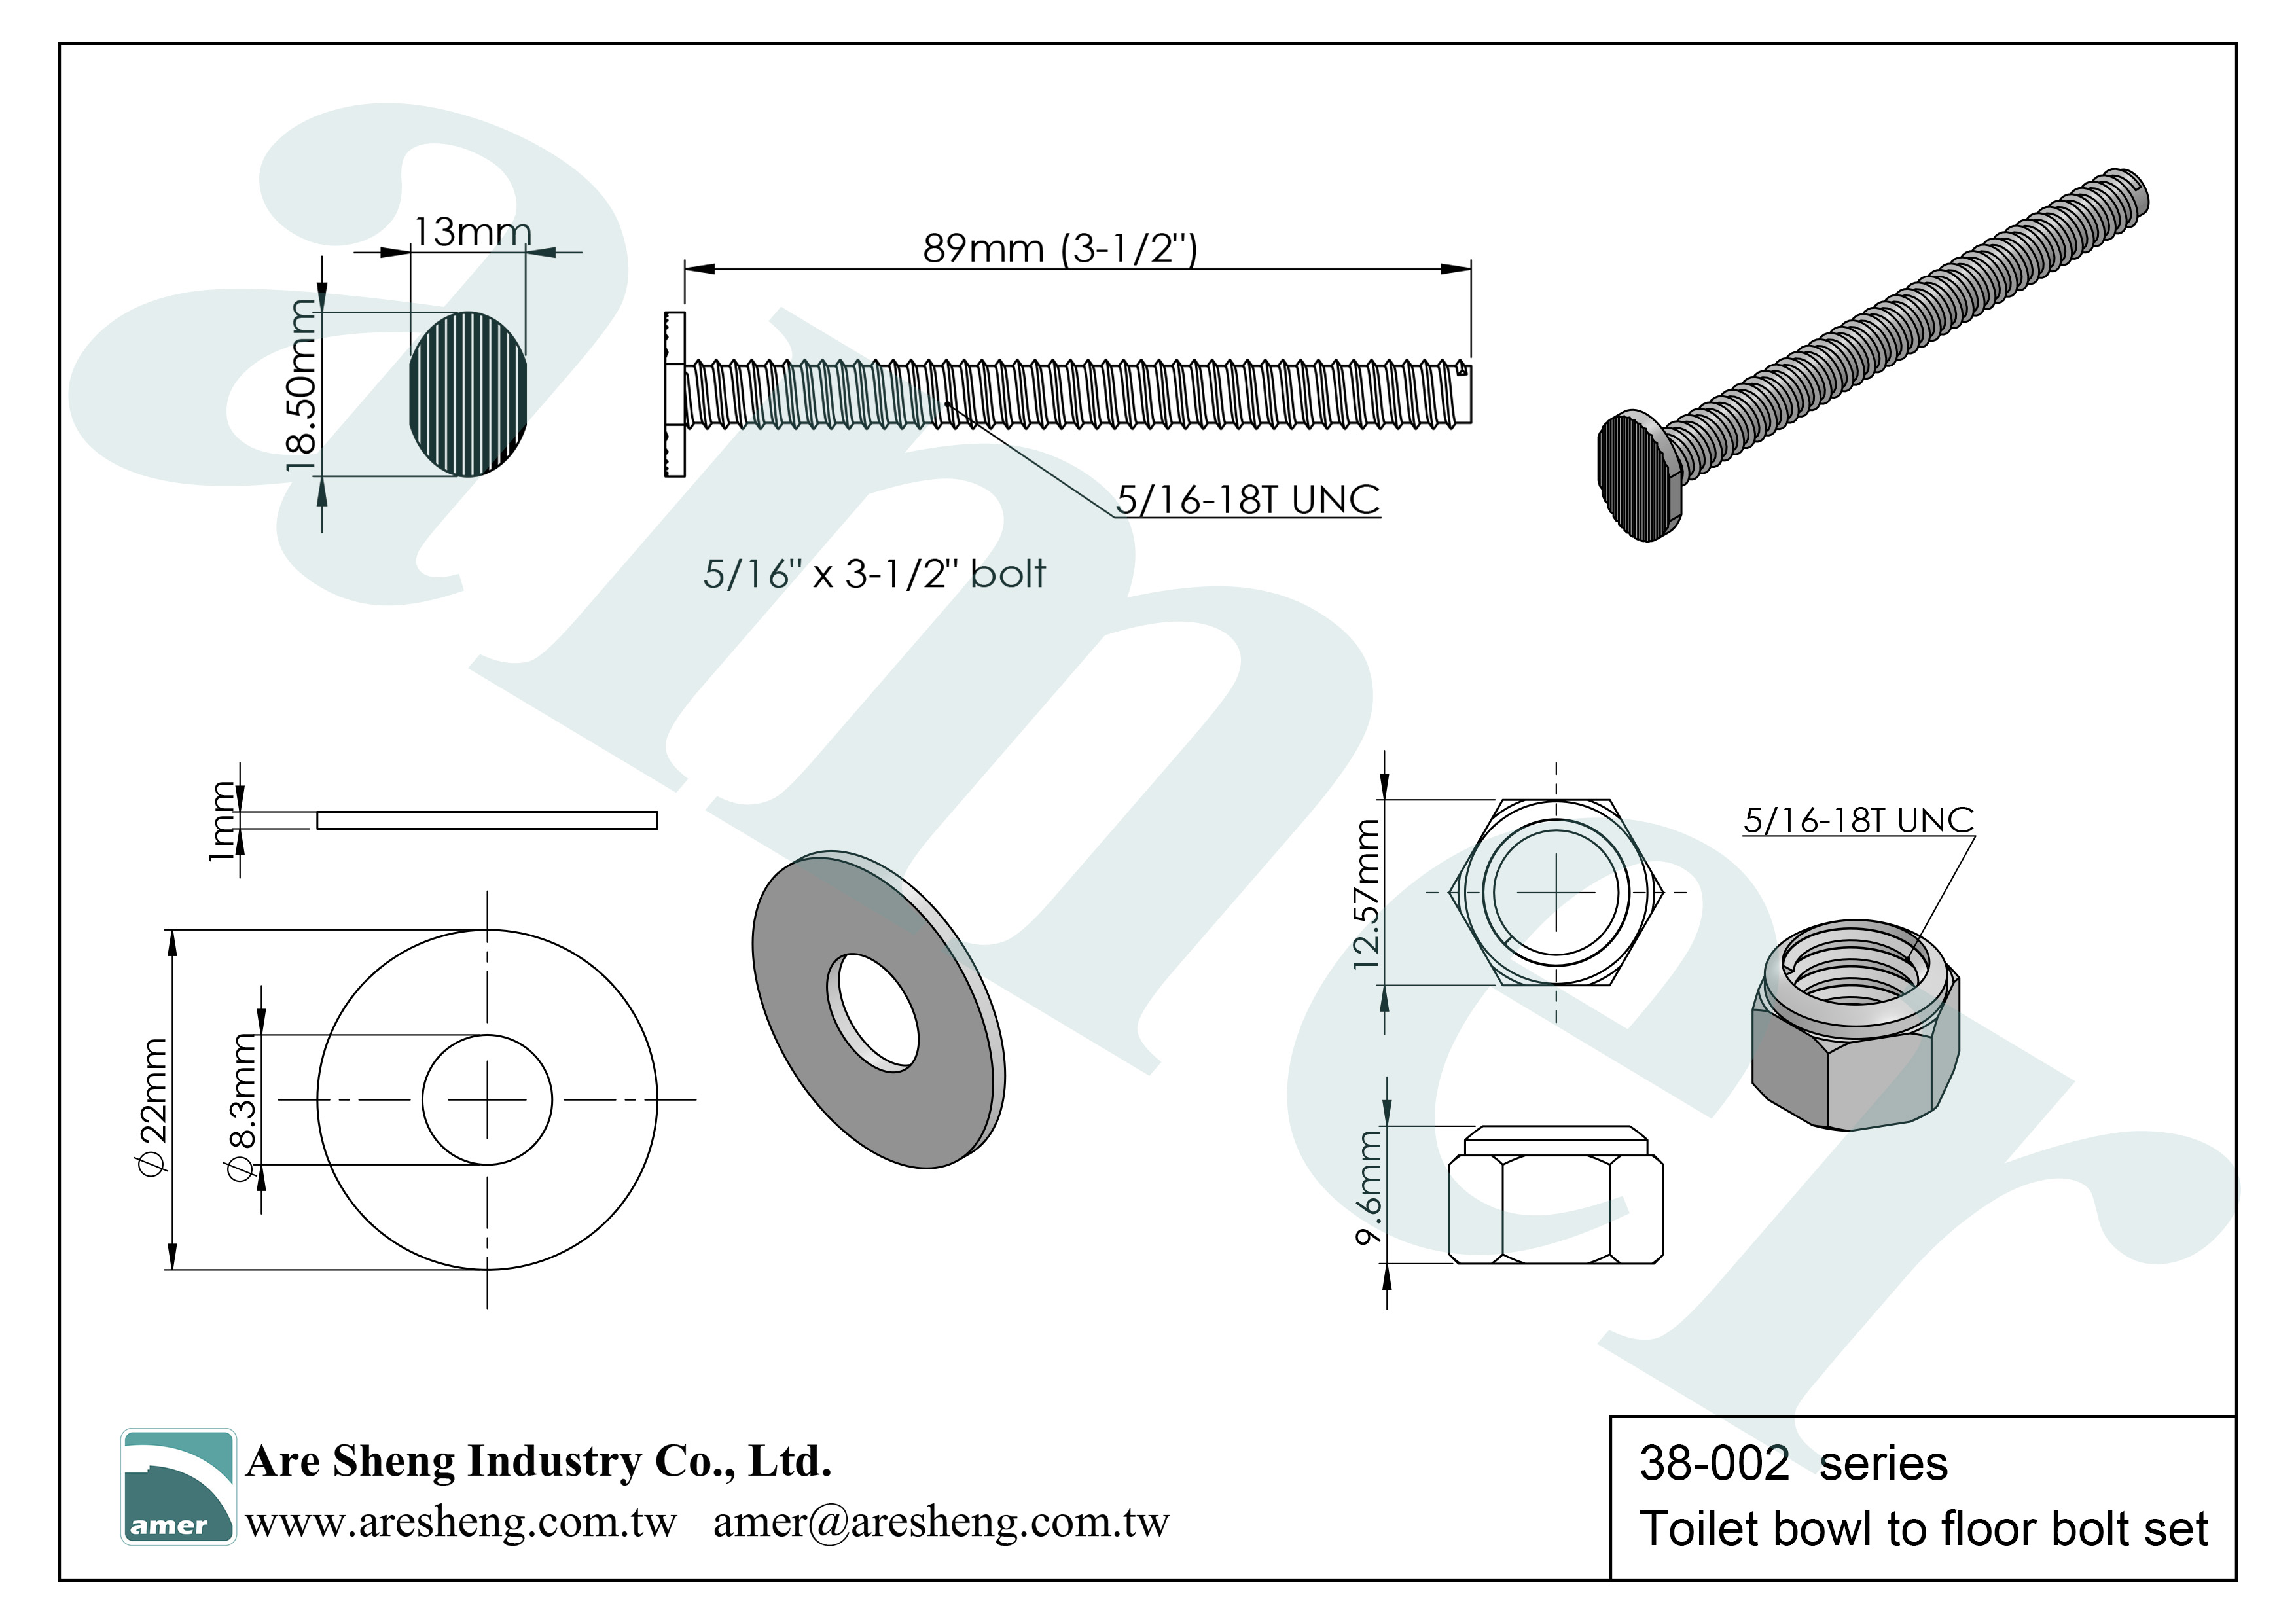
5/16”OD x 3-1/2” Brass Closet Bolt With Steel Assembly
This anchor bolt set securely fastens the toilet bowl to floor. The 5/16” OD durable brass bolt provides strength and corrosion protection. Its brass material can be cut off the excess part easily in the last step of installation. This set includes steel open nuts in yellow zinc plated. It also comes with zinc plated steel round washers.
| Description |
| Model No. | Bolt size | Bolt material | Assembly material |
| 38-002HB-516312 | 5/16” OD x 3-1/2” L | Brass bolt *2pcs | YZP steel open nut*2pcs
ZP steel round washer*2pcs |
38-002 series
Toilet bowl to floor bolt set (6pcs)
Include 2 bolts, 2 open nuts, 2 round washers
Function: Anchor toilet bowl to floor
* 5/16”OD x 3-1/2” solid brass bolt
* Zinc plated steel washer
* Yellow zinc plated steel open nut
* 6pcs in a set
| Dimension drawing of each part |
-Dimension of the 5/16"OD x 3-1/2" toilet bolt
-Dimension of the 5/16"-18T UNC open nut
-Dimension of the round washer
-Dimension of the plastic captive washer
|Size and material table|
Size and material table| Model No. | Bolt size | Bolt material | Assembly material |
| 38-002B-14214 | 1/4” OD x 2-1/4” L | Brass bolt *2pcs | Brass open nut*2pcs
Brass round washer*2pcs
|
| 38-002HB-14214 | 1/4” OD x 2-1/4” L | Brass bolt*2pcs | YZP steel open nut*2pcsZP steel round washer*2pcs
|
| 38-002S-14214 | 1/4” OD x 2-1/4” L | YZP steel bolt*2pcs | YZP steel open nut*steel round washer*2pcs
|
| 38-002B-14312 | 1/4” OD x 3-1/2” L | Brass bolt*2pcs | Brass open nut*2pcs
Brass washer*2pcs
|
| 38-002HB-14312 | 1/4” OD x 3-1/2” L | Brass bolt*2pcs | YZP steel open nut*2pcs
ZP steel round washer*2pcs
|
| 38-002S-14312 | 1/4” OD x 3-1/2” L | YZP steel bolt *2pcs | YZP steel open nut*2pcs
ZP steel round washer*2pcs
|
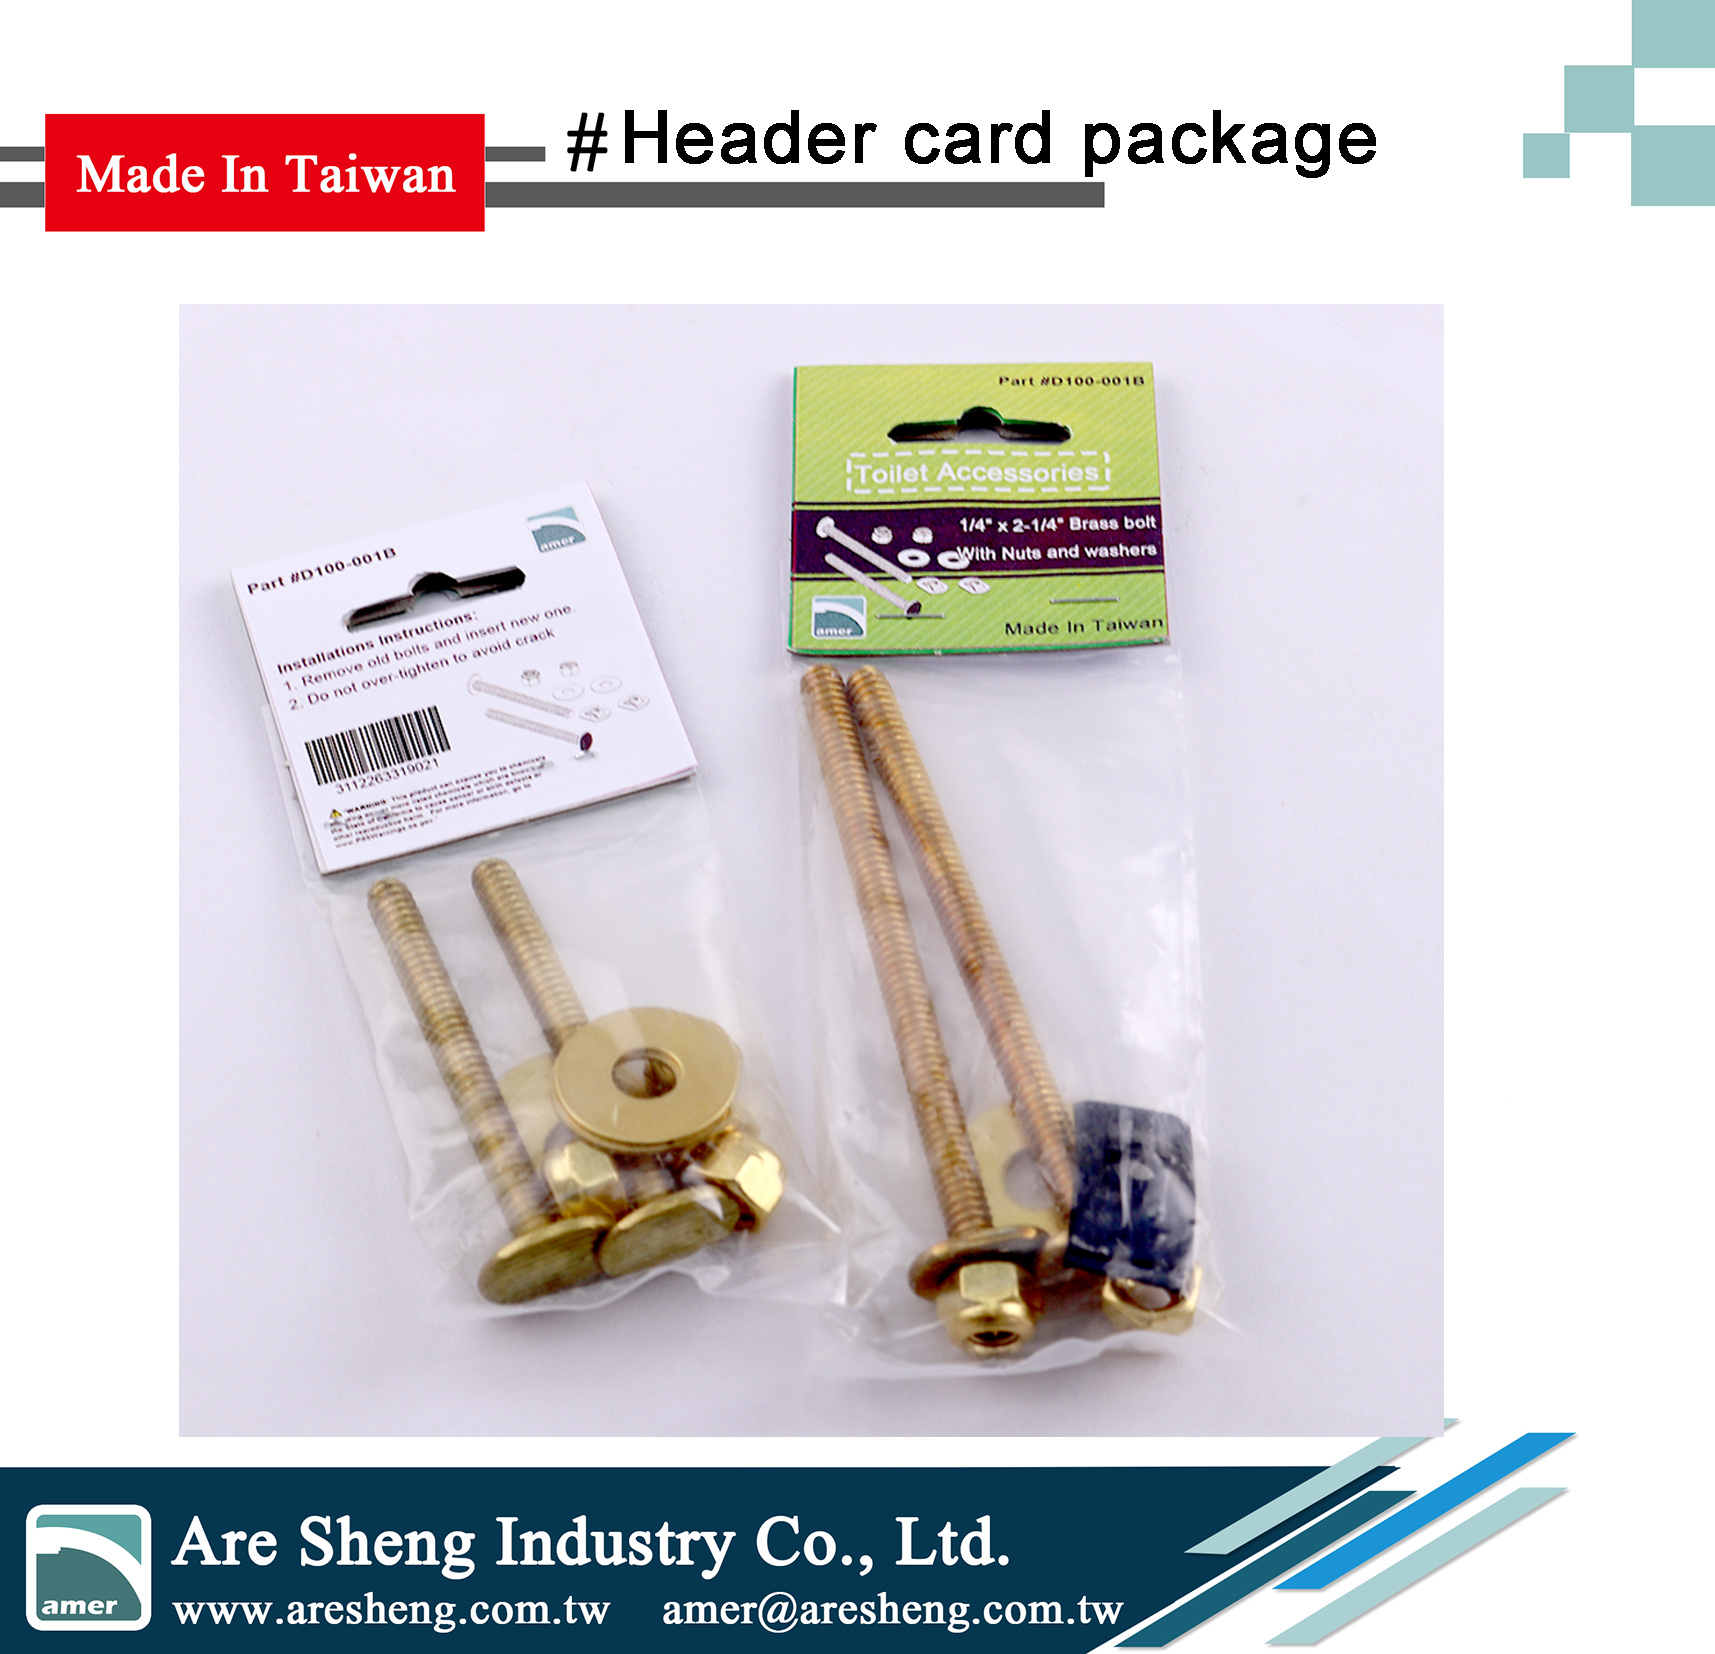
| Package |
Three packages for your choice
1. 1set in a sealed bag
2. 1set in bag with header card
3. 1set in blister sliding card
*We can also provide private brand labels or cards
| Features & Installation |
How to install toilet bowl?
When you are modeling the toilet, here are some tips to help you do it better and faster.
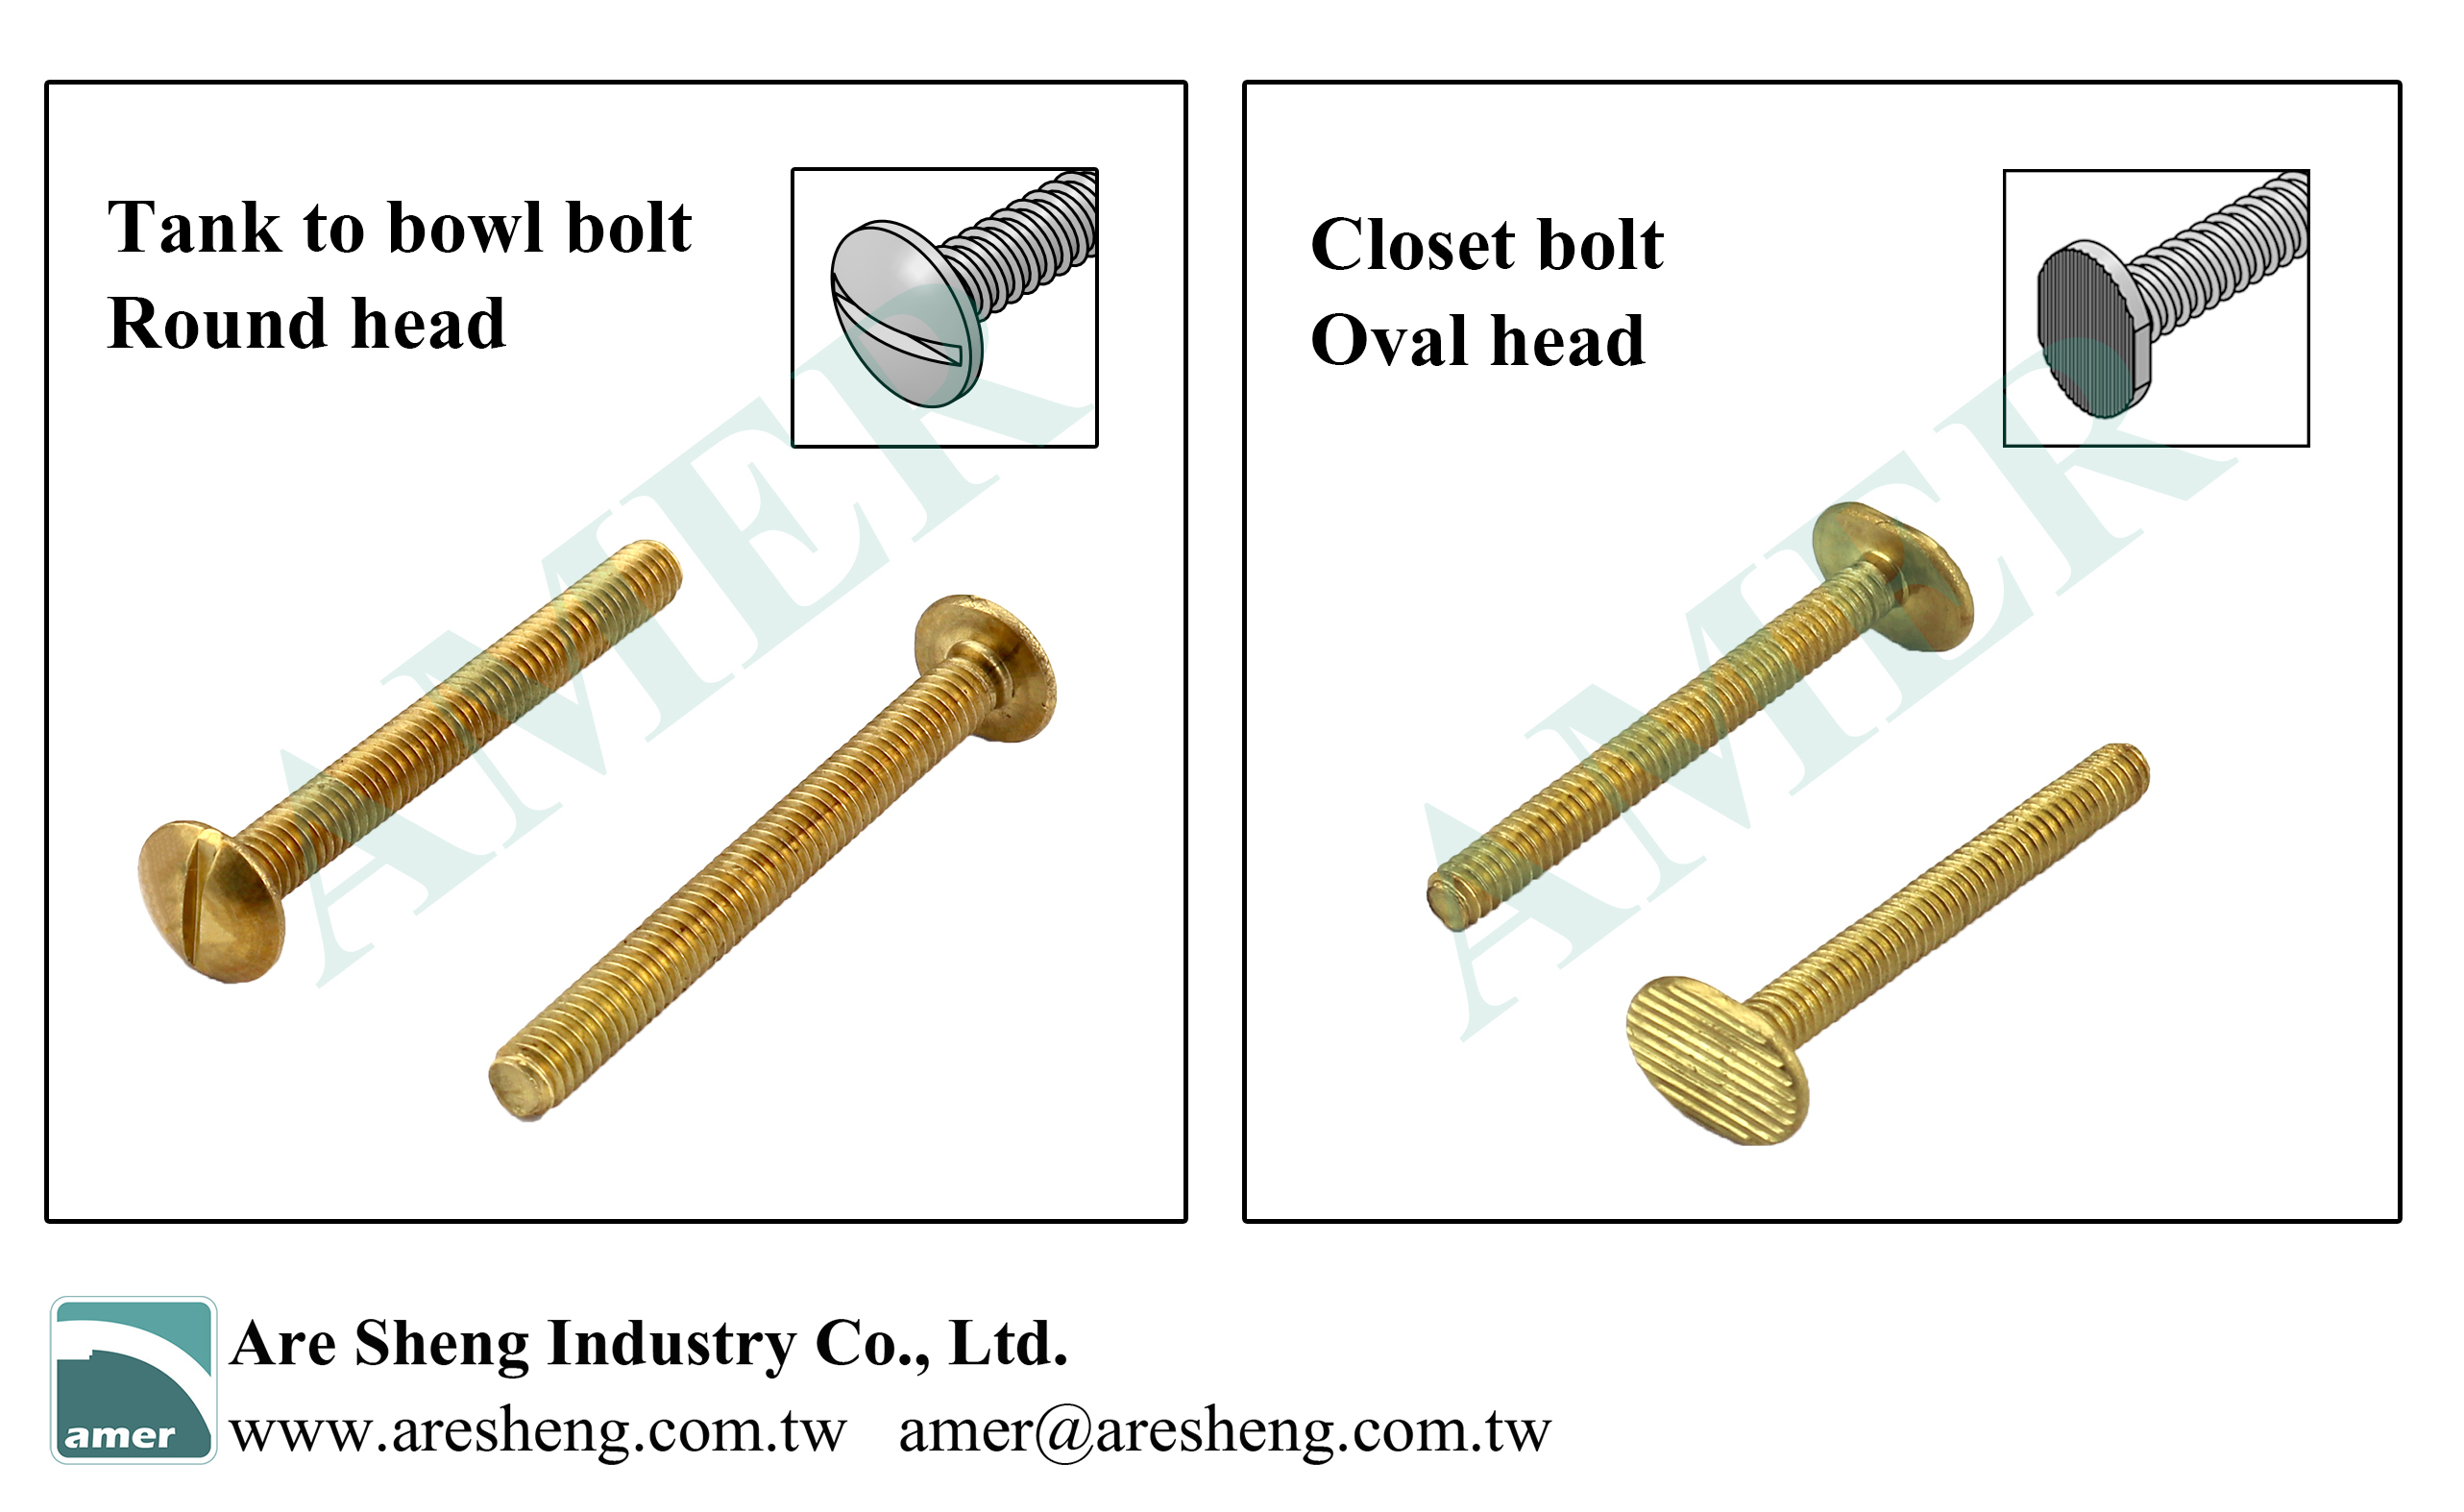
Choose right kits
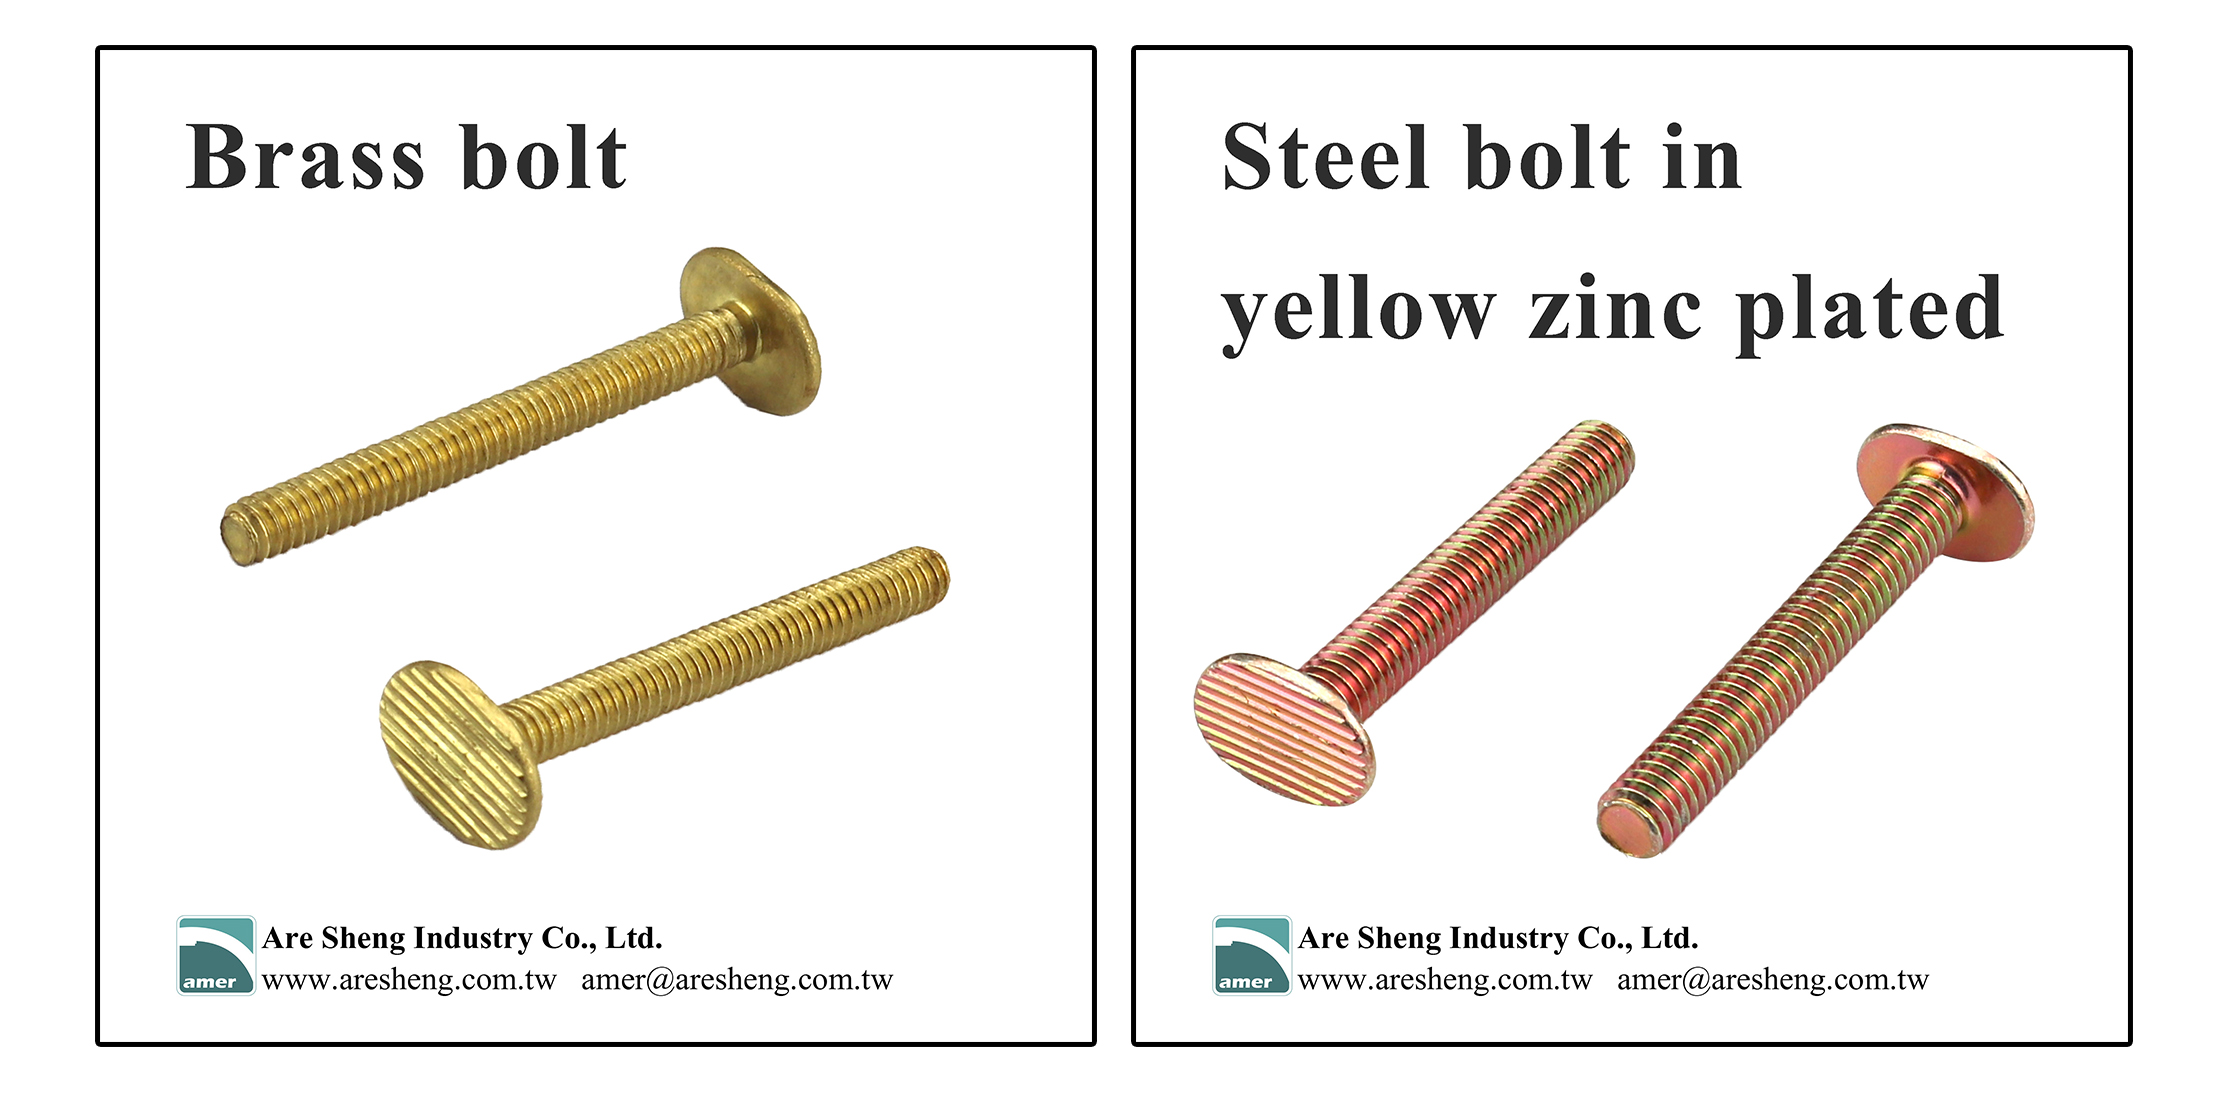
When you visit the hardware store, you will find that there are different types of bolt. The most common models are like below. The left one is tank bolt. The right side is closet bolt. Their head styles are different. The tank bolt is round head. The closet bolt is oval head. To install the toilet bowl, you will need the closet bolt (picture at right side).
The reason why you need an oval-head bolt is because it can easily pass through the toilet flange and slide into the track of the flange. Its oval-head also allows it to be better fixed.
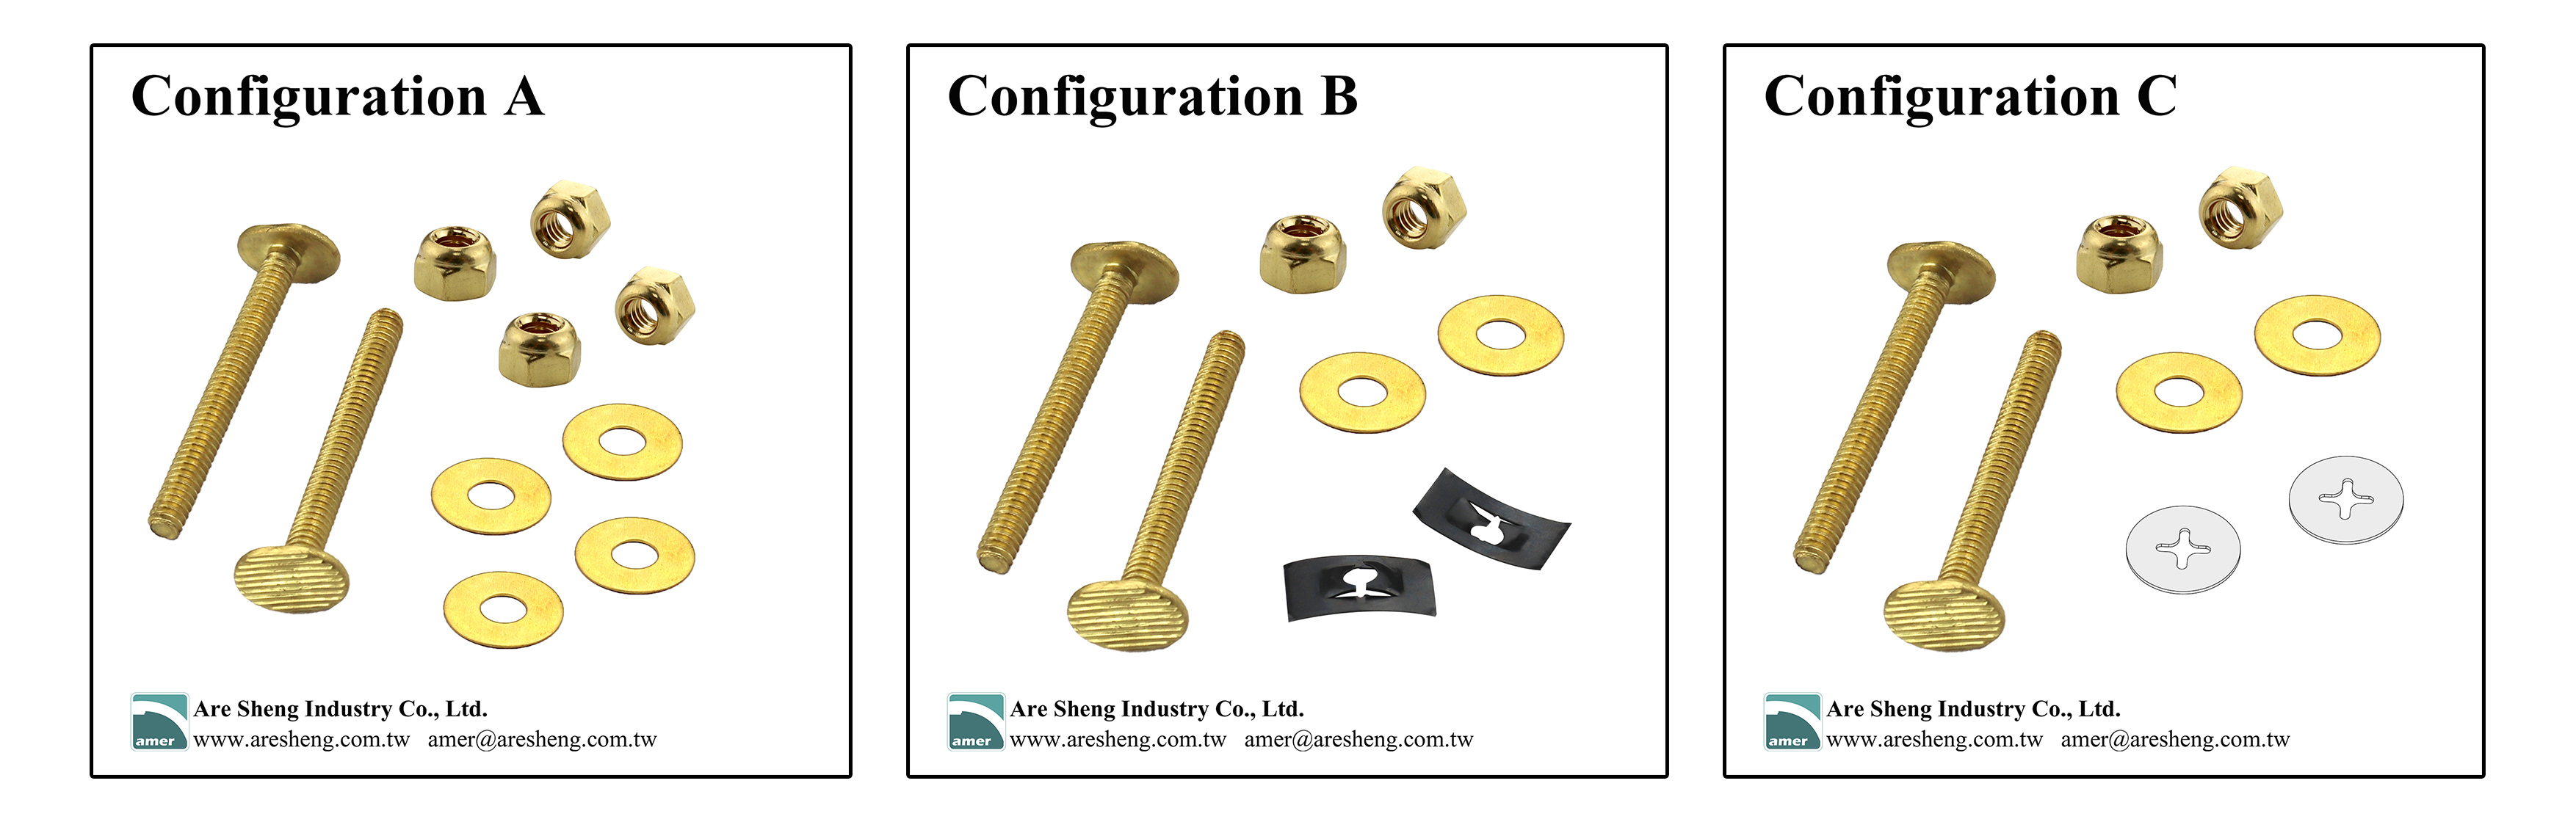
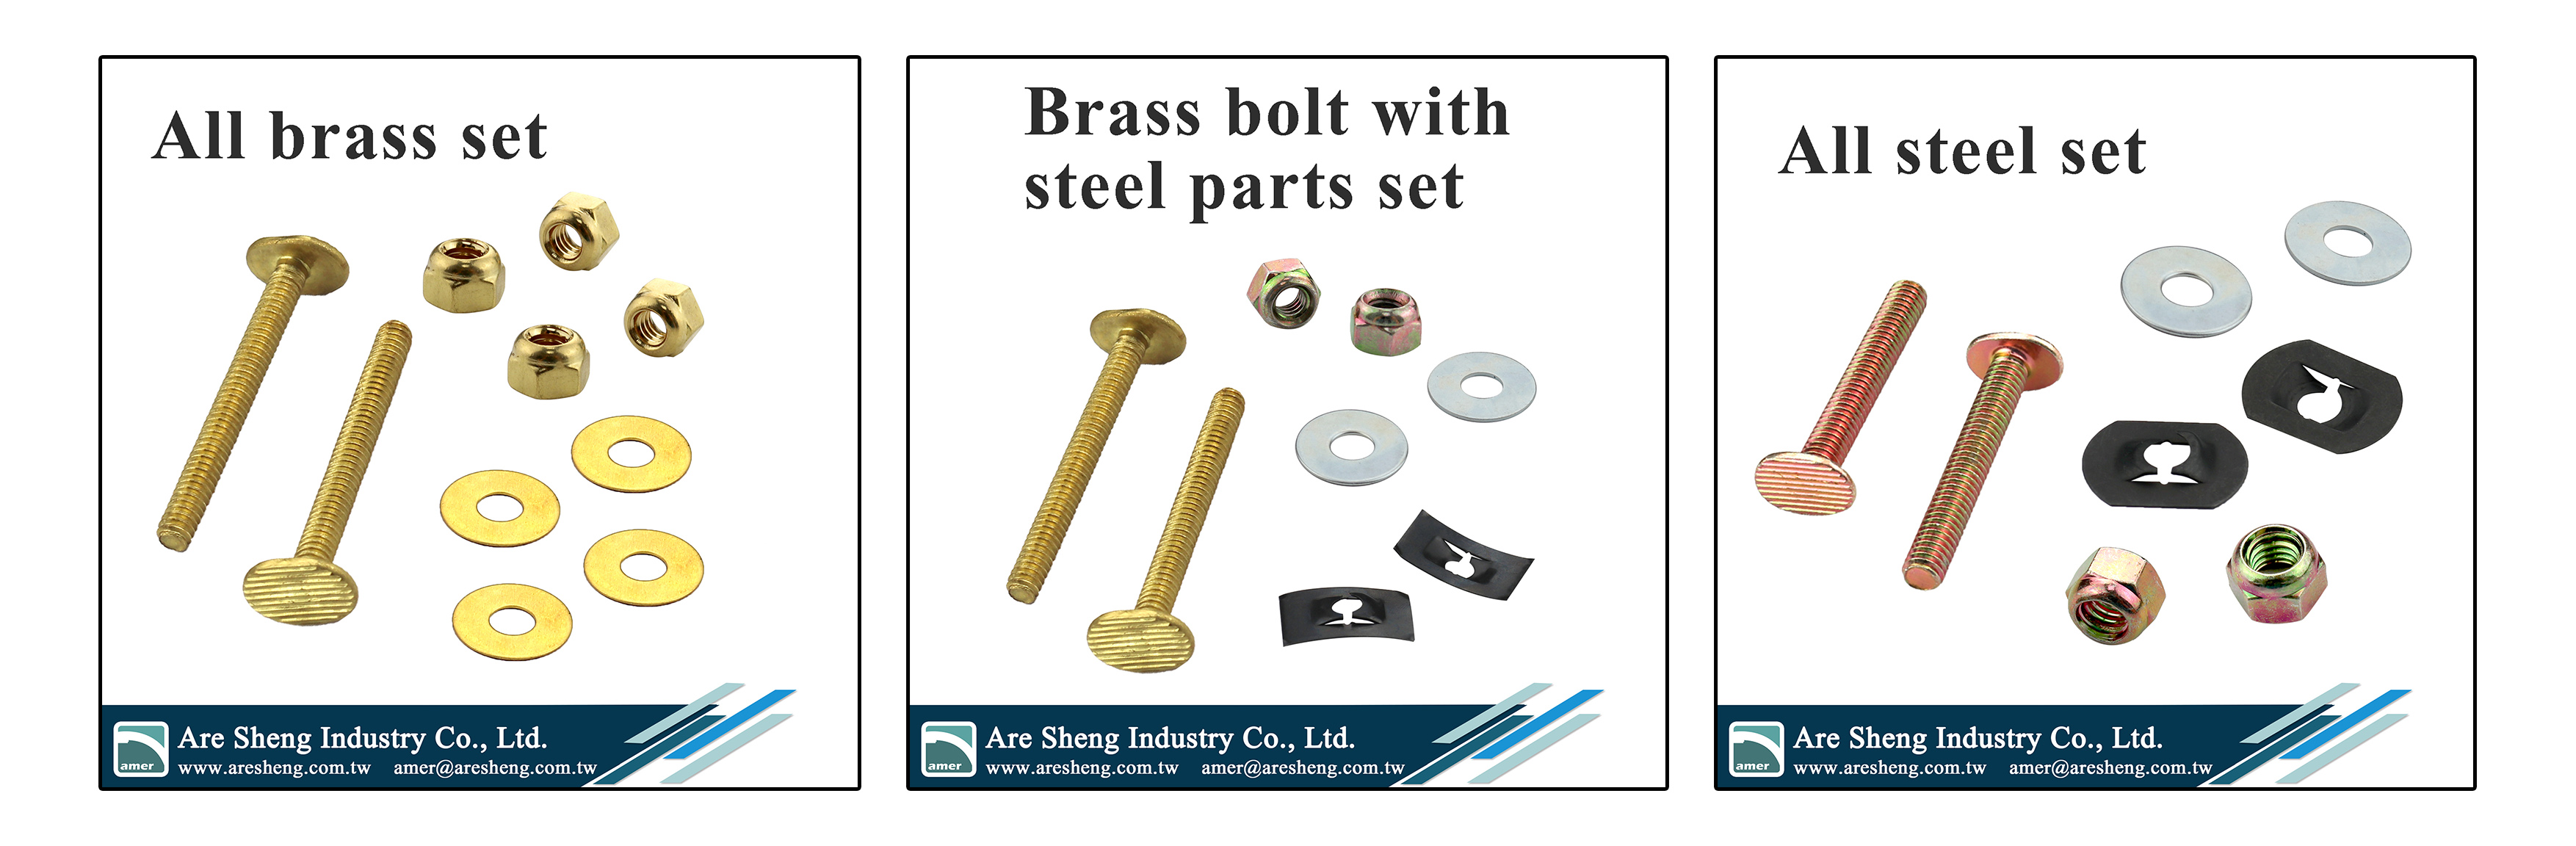
What’s inside a closet bolt repair kit set?
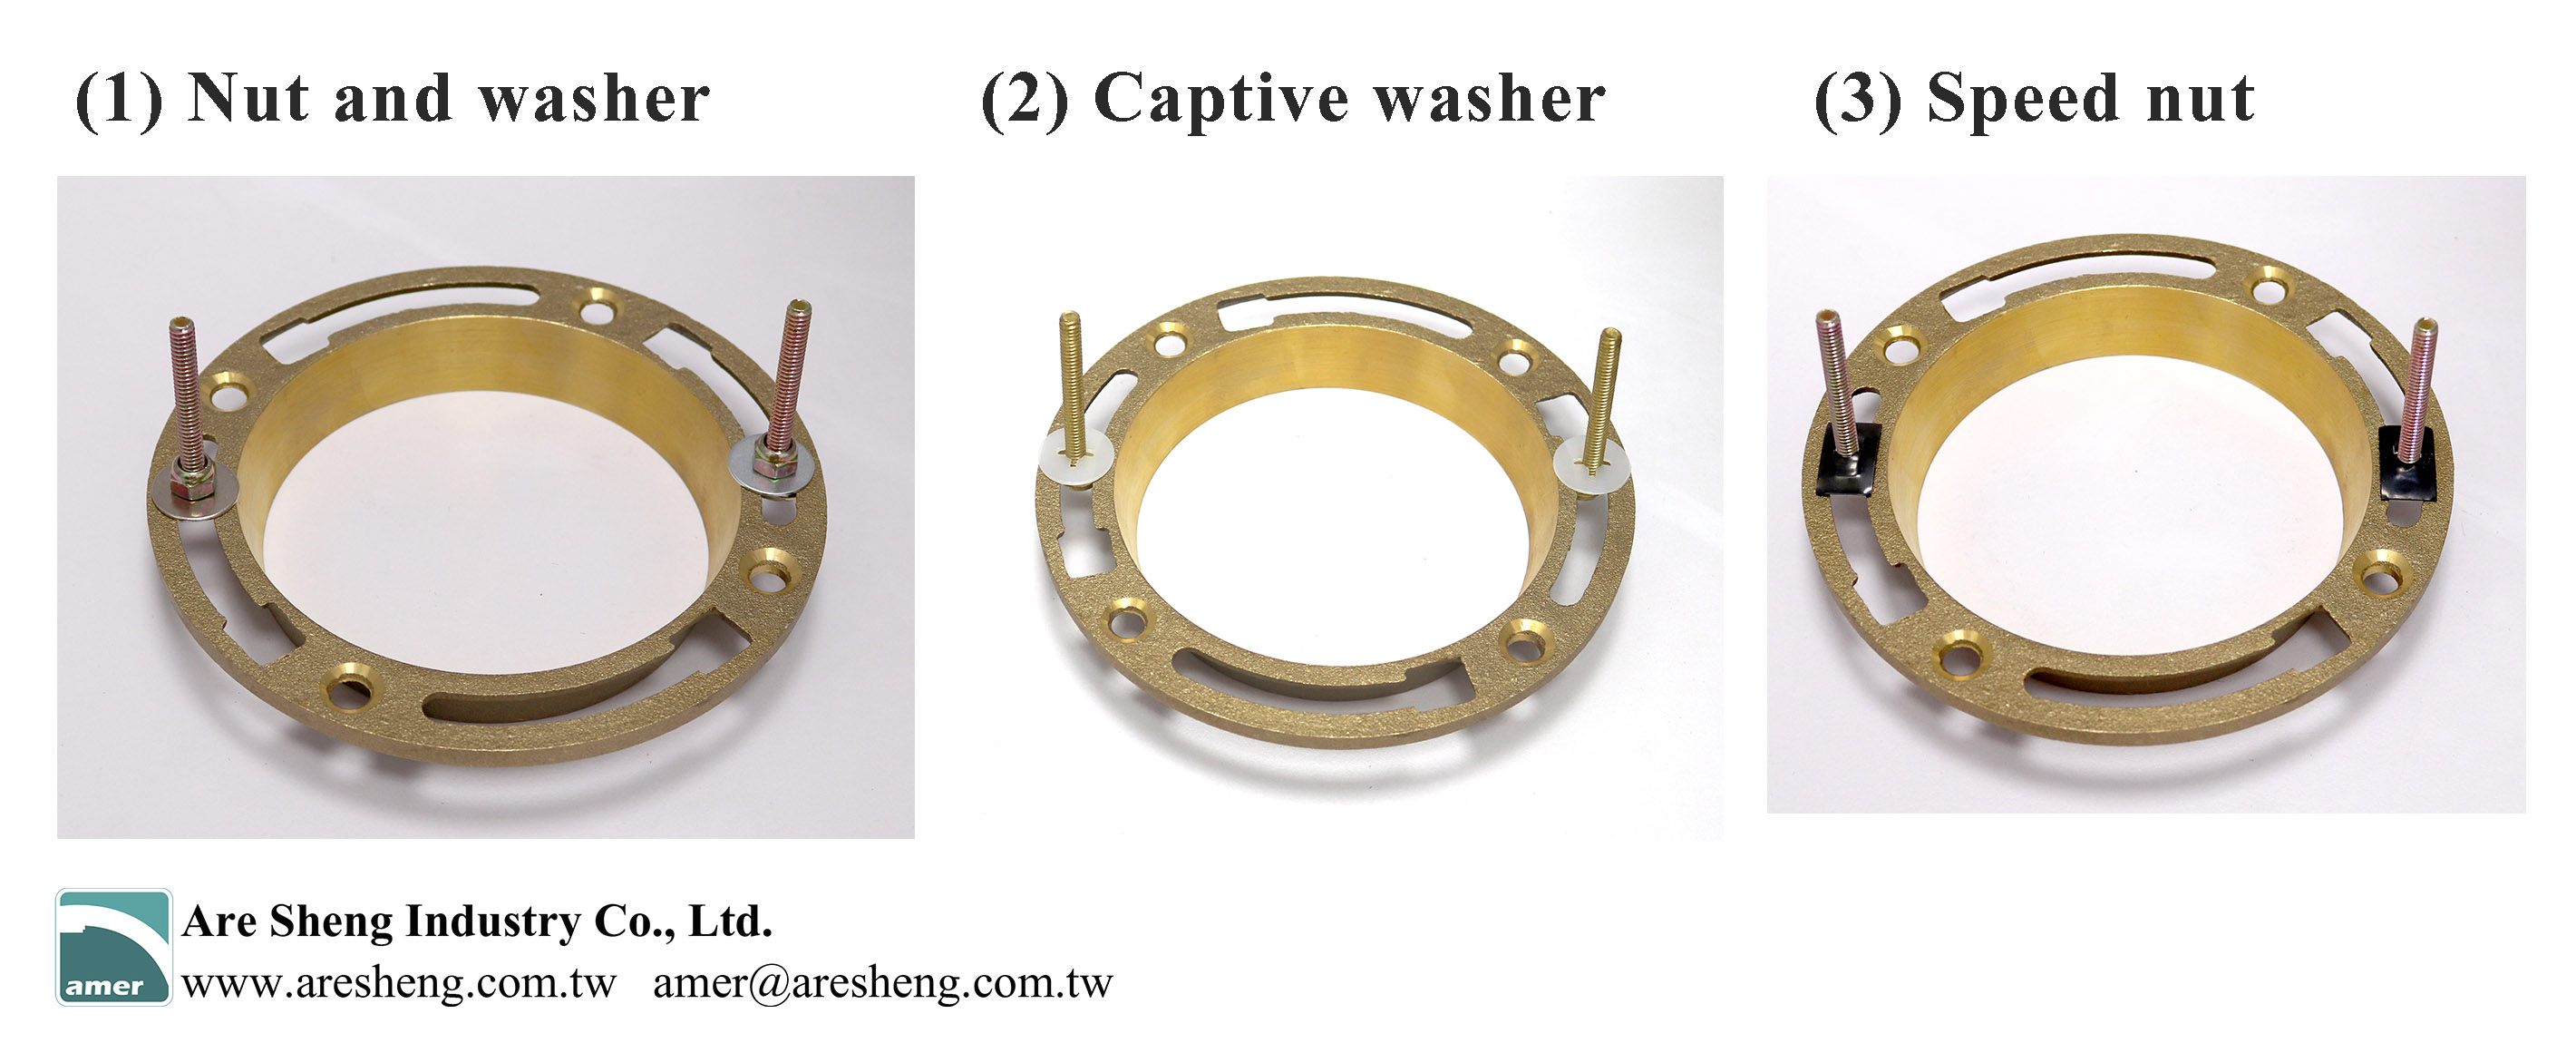
Configuration A: 2 closet bolts, 4 open nuts, 4 metal washers
Configuration B: 2 closet bolts, 2 open nuts, 2 metal washers, 2 speed nut
Configuration C: 2 closet bolts, 2 open nuts, 2 plastic captive washers, 2 metal washers
Configuration A
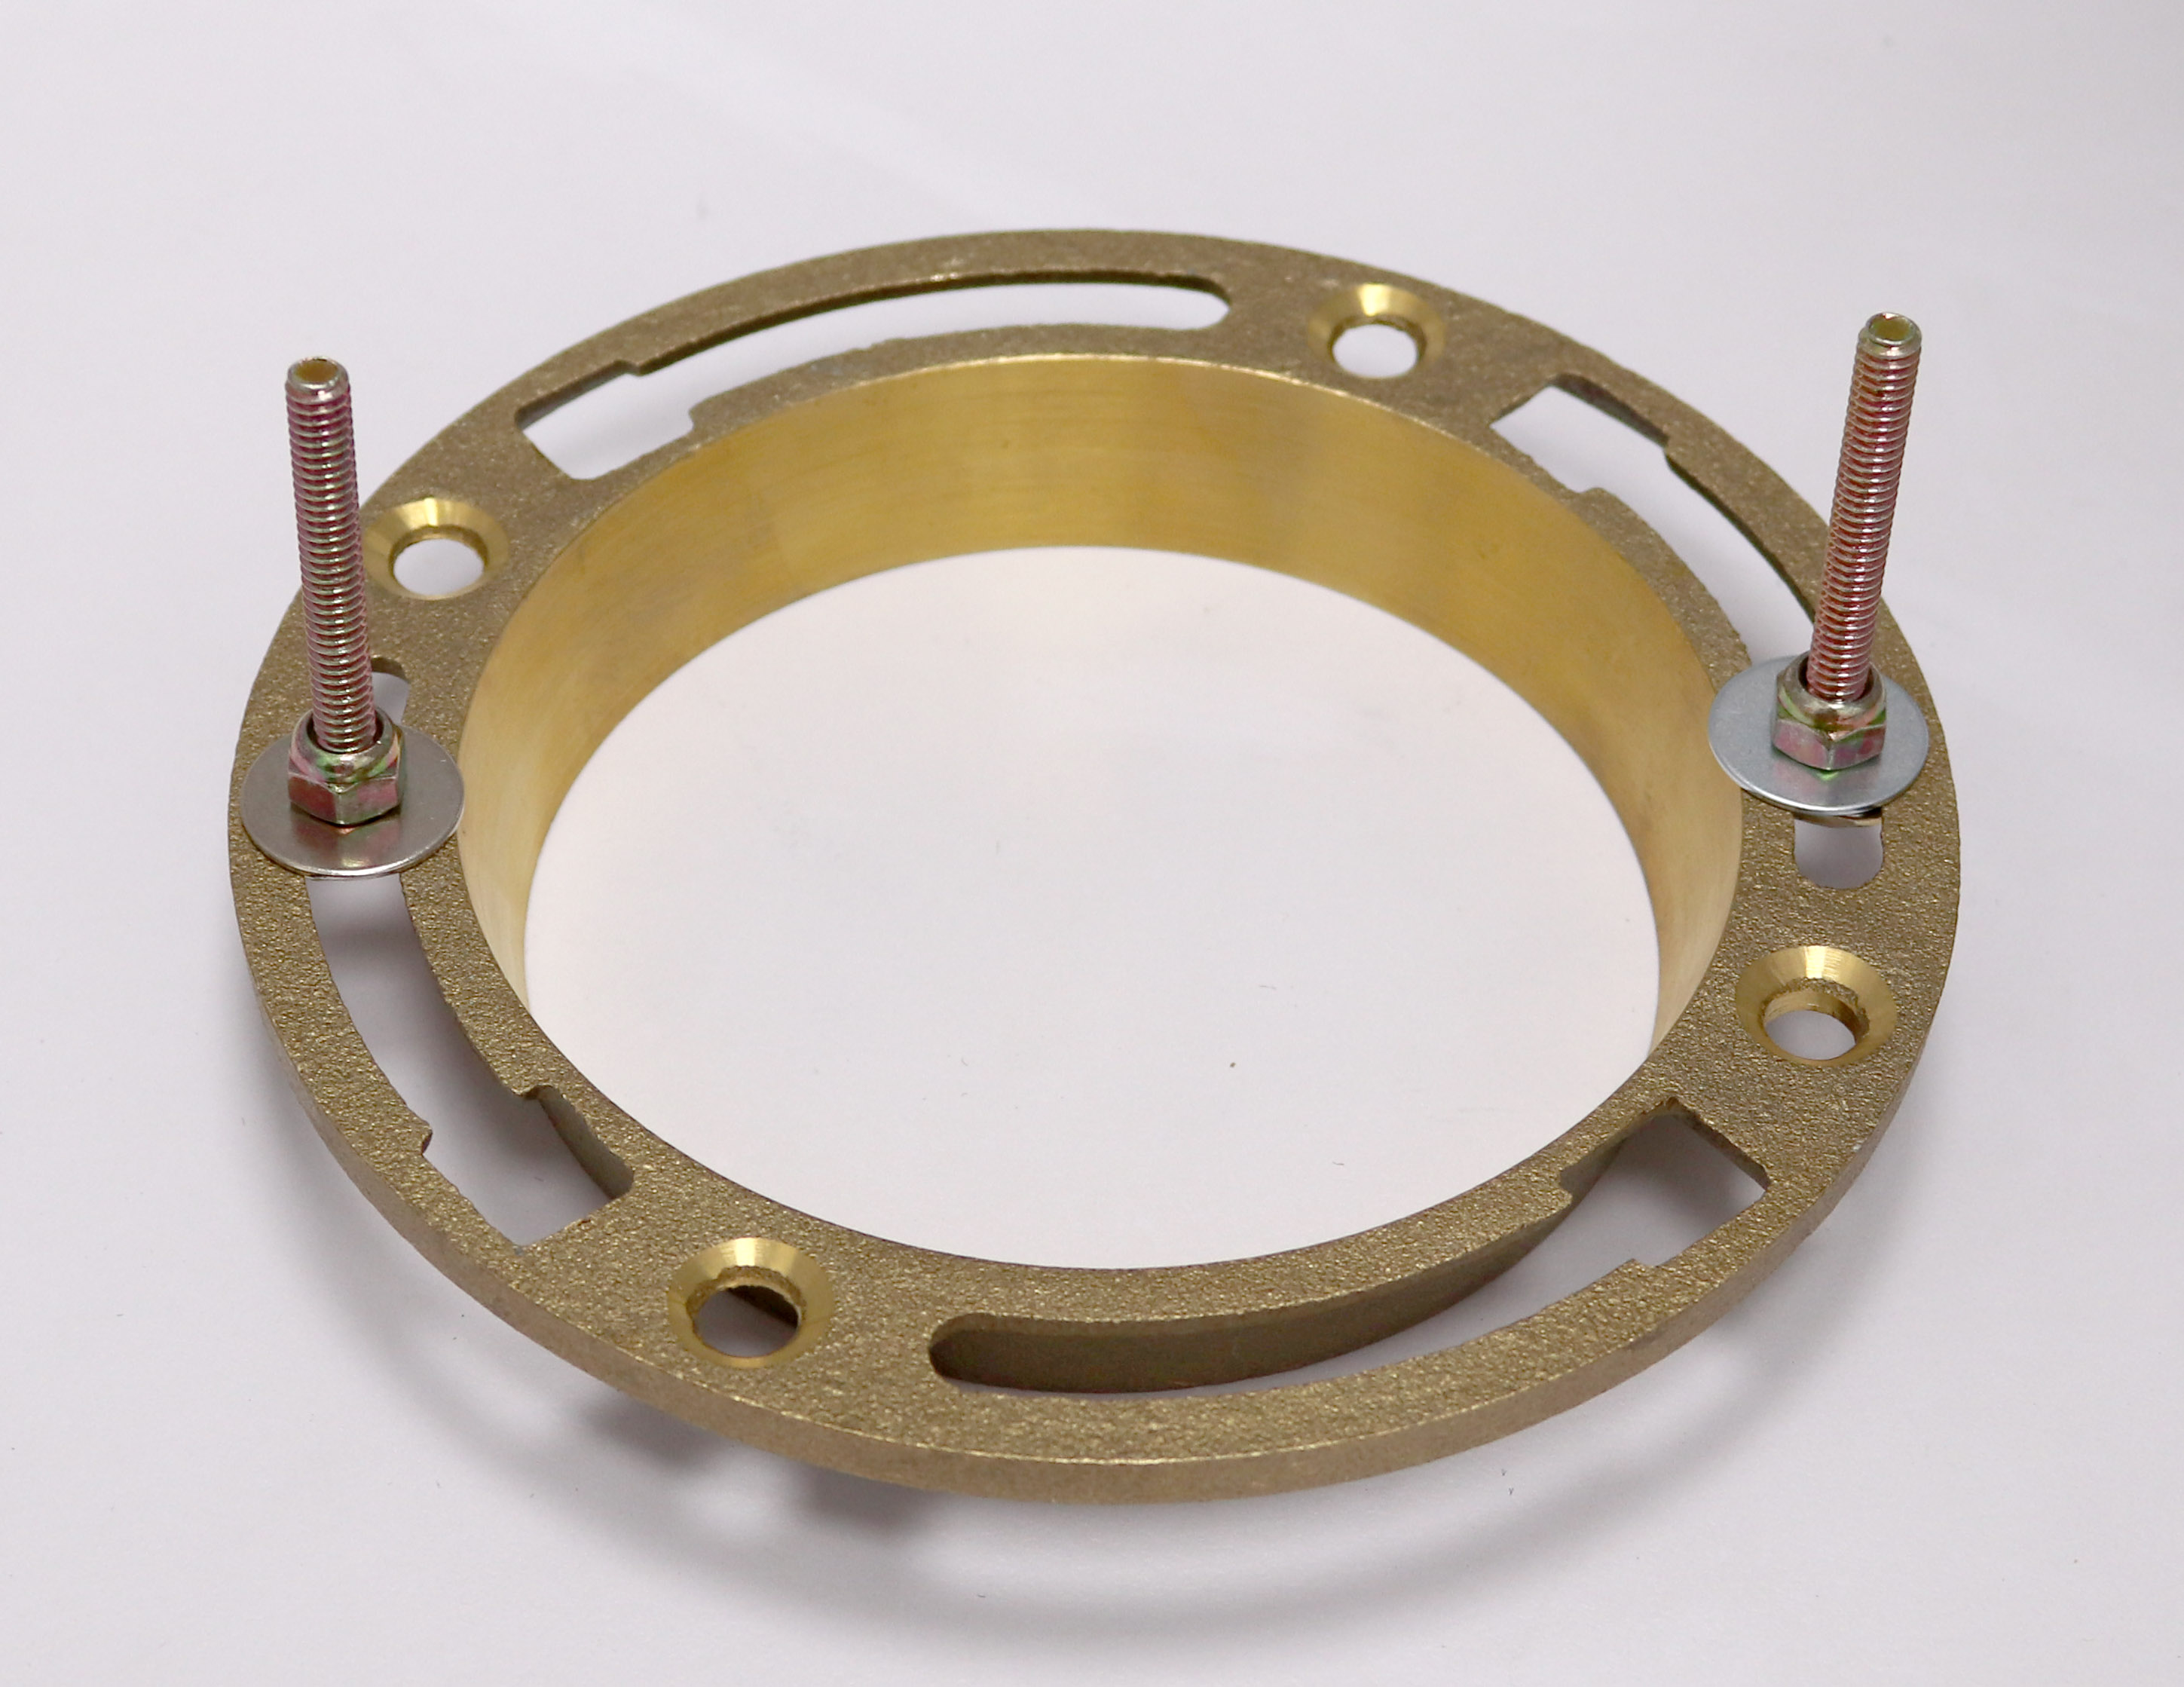
This is the easiest way to install the toilet bowl. The step of positioning the toilet bowl is the most frustrating part in the installation process. Each time you miss positioning it on the bolt, you risk crushing and shifting the wax ring. But if you have 4 open nuts and 4 washers, you can fix the bolt on the toilet flange firmly like the picture below. In this way, the bolt will not move and slide when you are setting the toilet bowl.
Configuration B
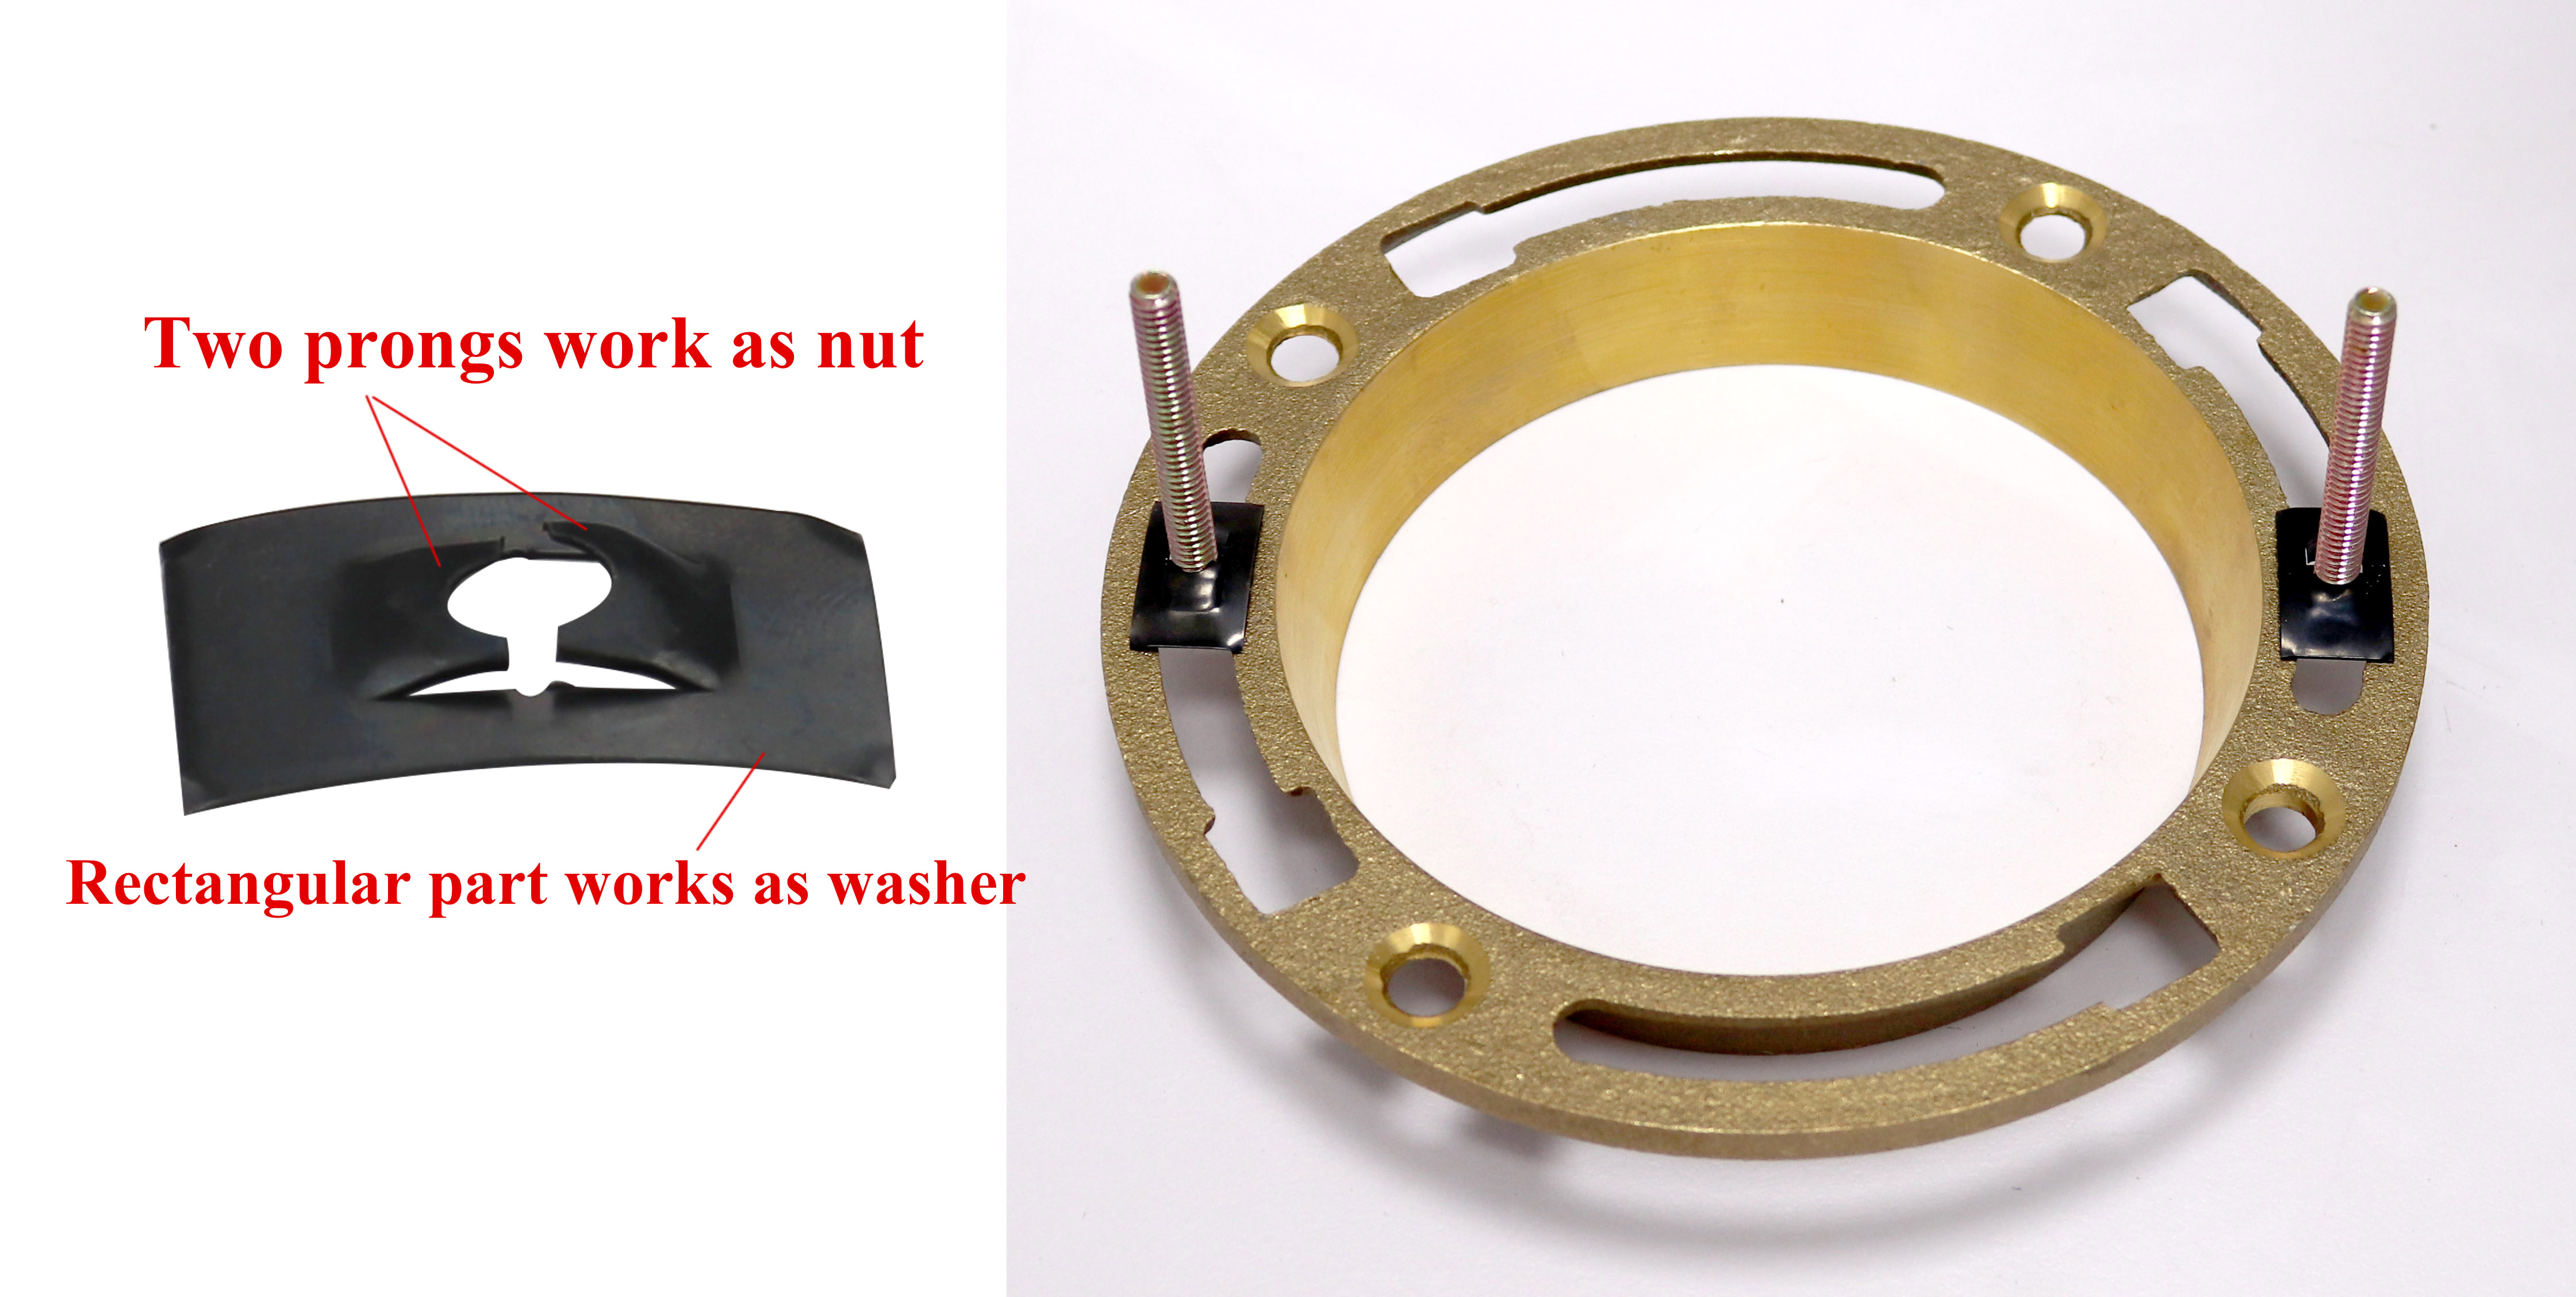
This set uses a steel speed nut to fix the bolt. The speed nut has two prongs to grip the thread of bolt. The rectangular part works as a washer to stuck the bolt head and nut on the track of the flange. It still allows the bolt to move a bit, but the price is cheaper. The picture below illustrates how it works.
Configuration C
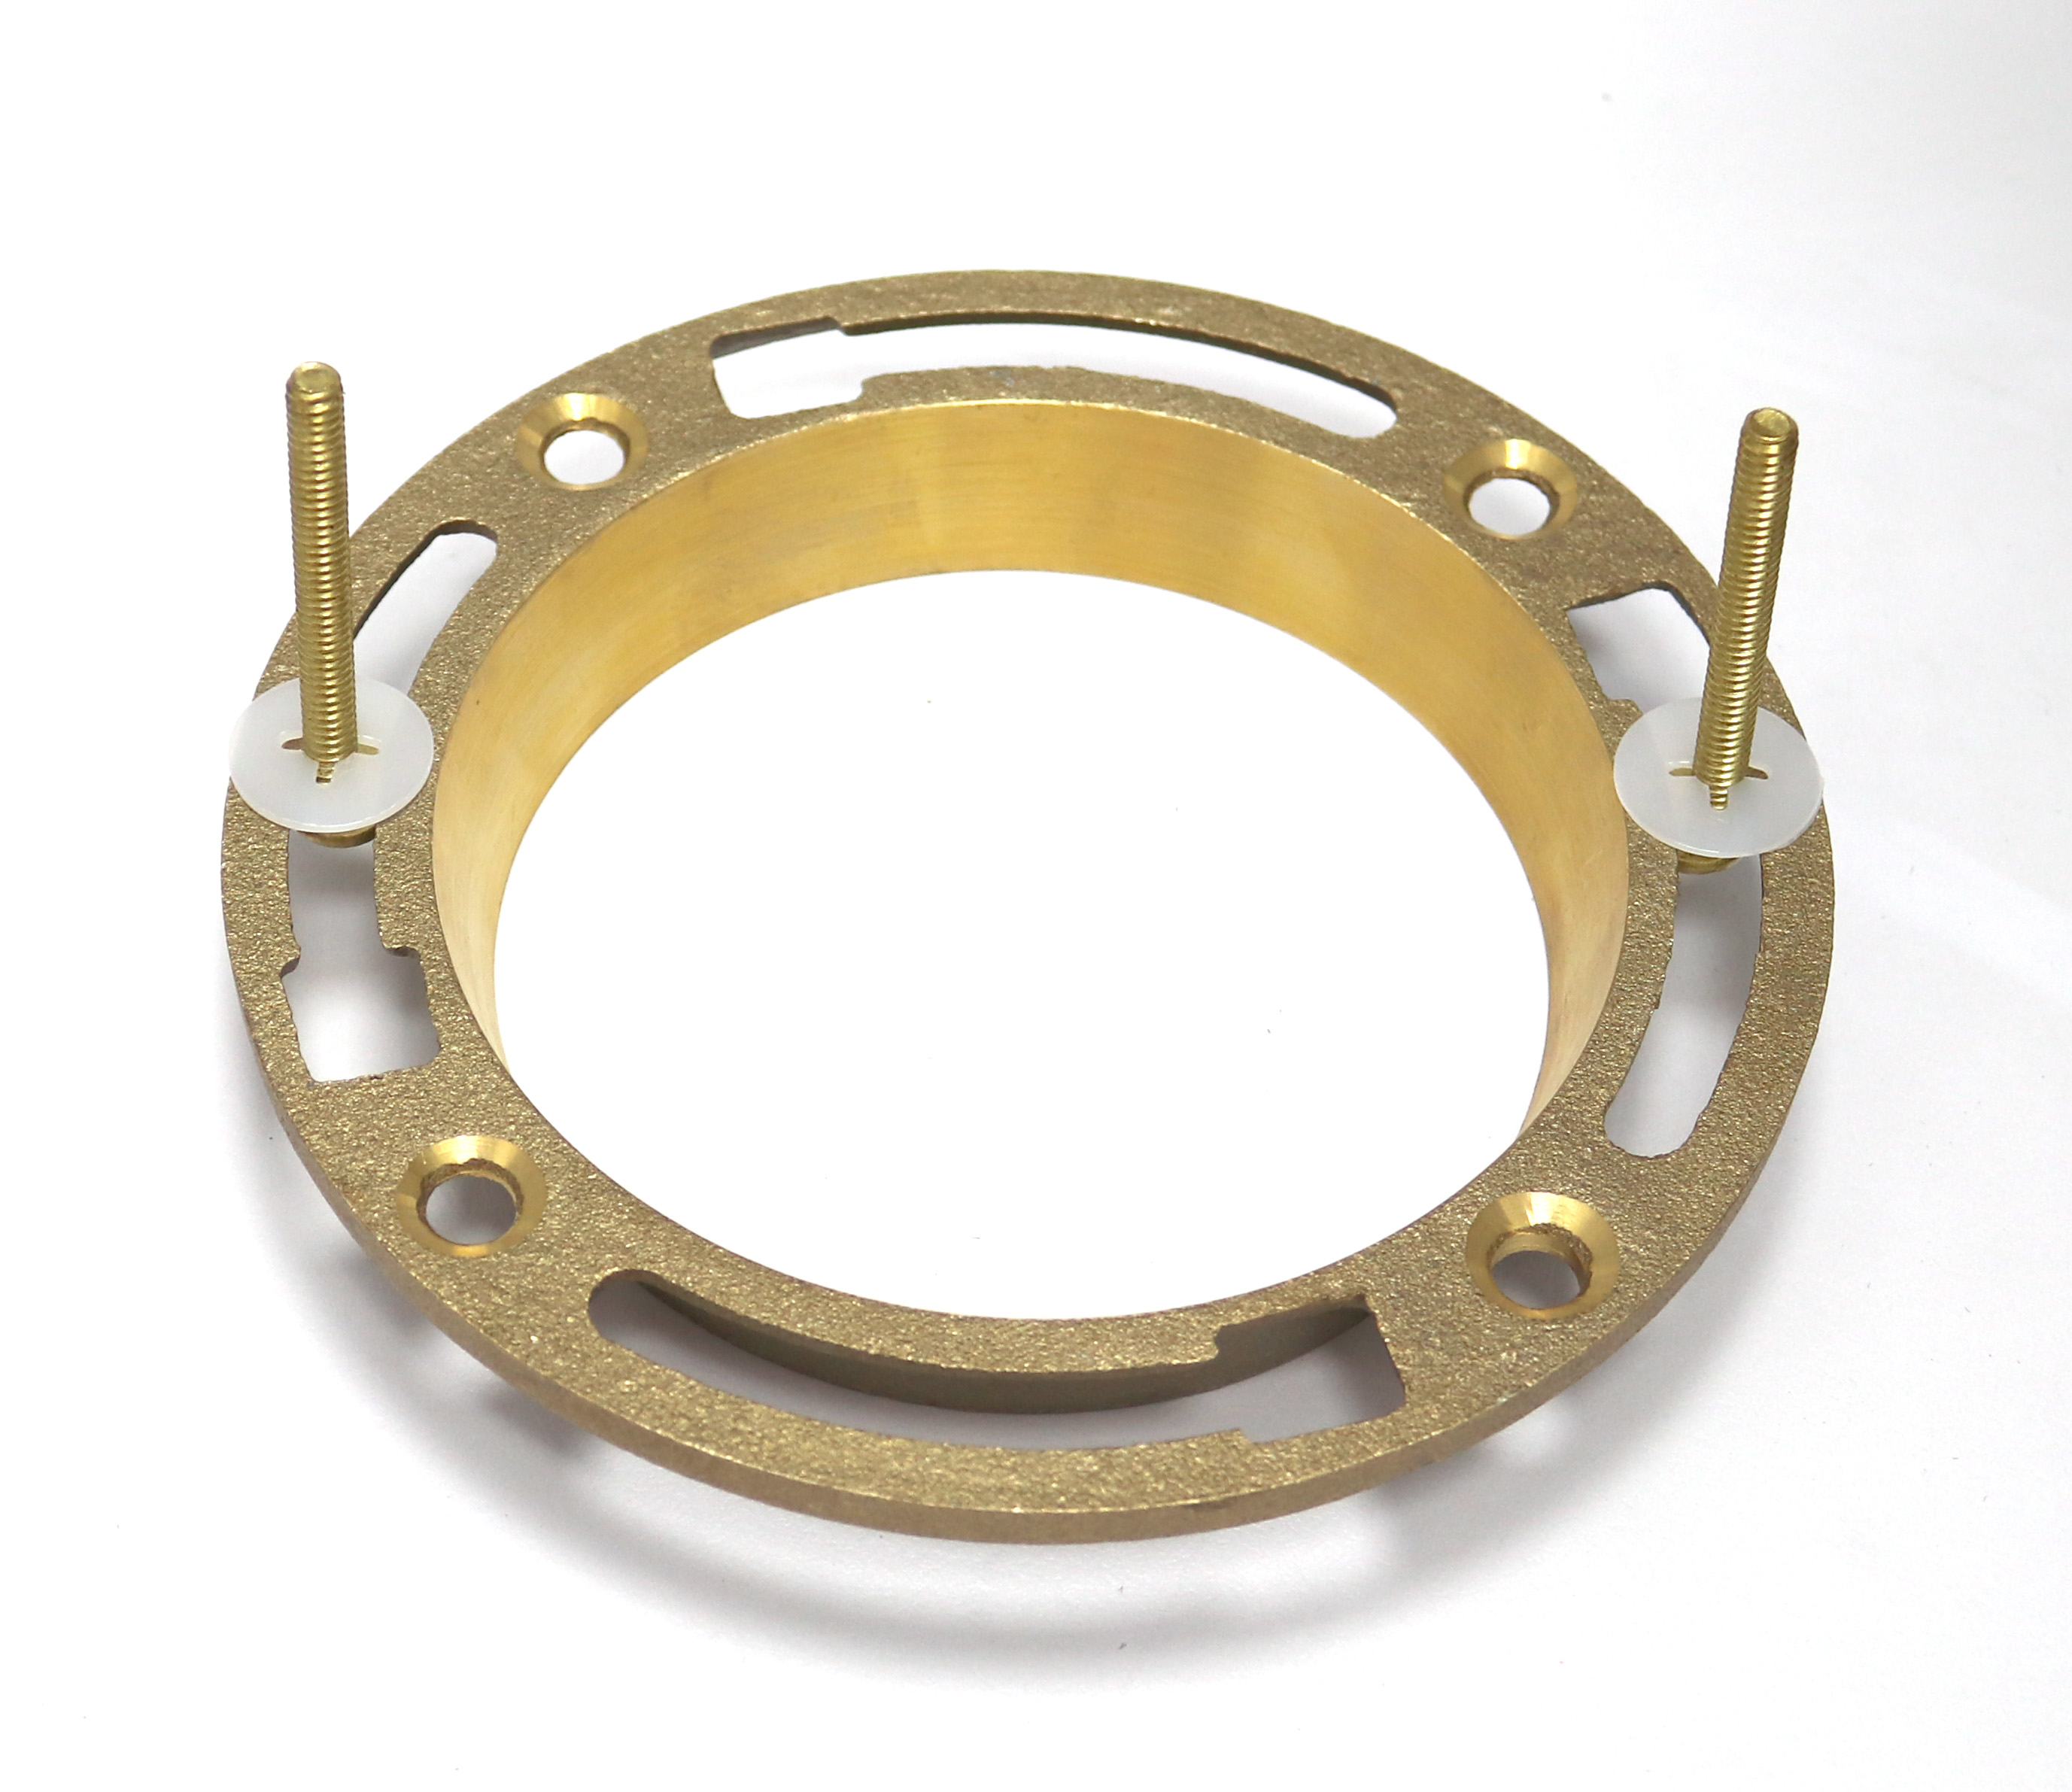
This set uses a plastic captive washer to fix the bolt. *Note that the captive washer is for 1/4” closet bolt. It cannot be used on 5/16” closet bolt. This set is the most economical assembly, but it allows the bolt to slide and move. You may take several tries. Refer to the installation below.
Material
There are different materials of the closet bolt. Brass is the best choice. It won’t rust away and will be easier to cut off later, but the price is higher. Here you should note that in the hardware store, you will find the brass bolt and steel bolt. The steel bolt usually have yellow zinc plated finish that makes them look like brass, so check the label and make sure you purchase the right one.
Also take a look on the material of other parts. Sometimes, it comes with a brass bolt but all other parts are steel. The steel nut and washer will rust quickly and weld to the bolt due to the corrosion.
Installation Instruction
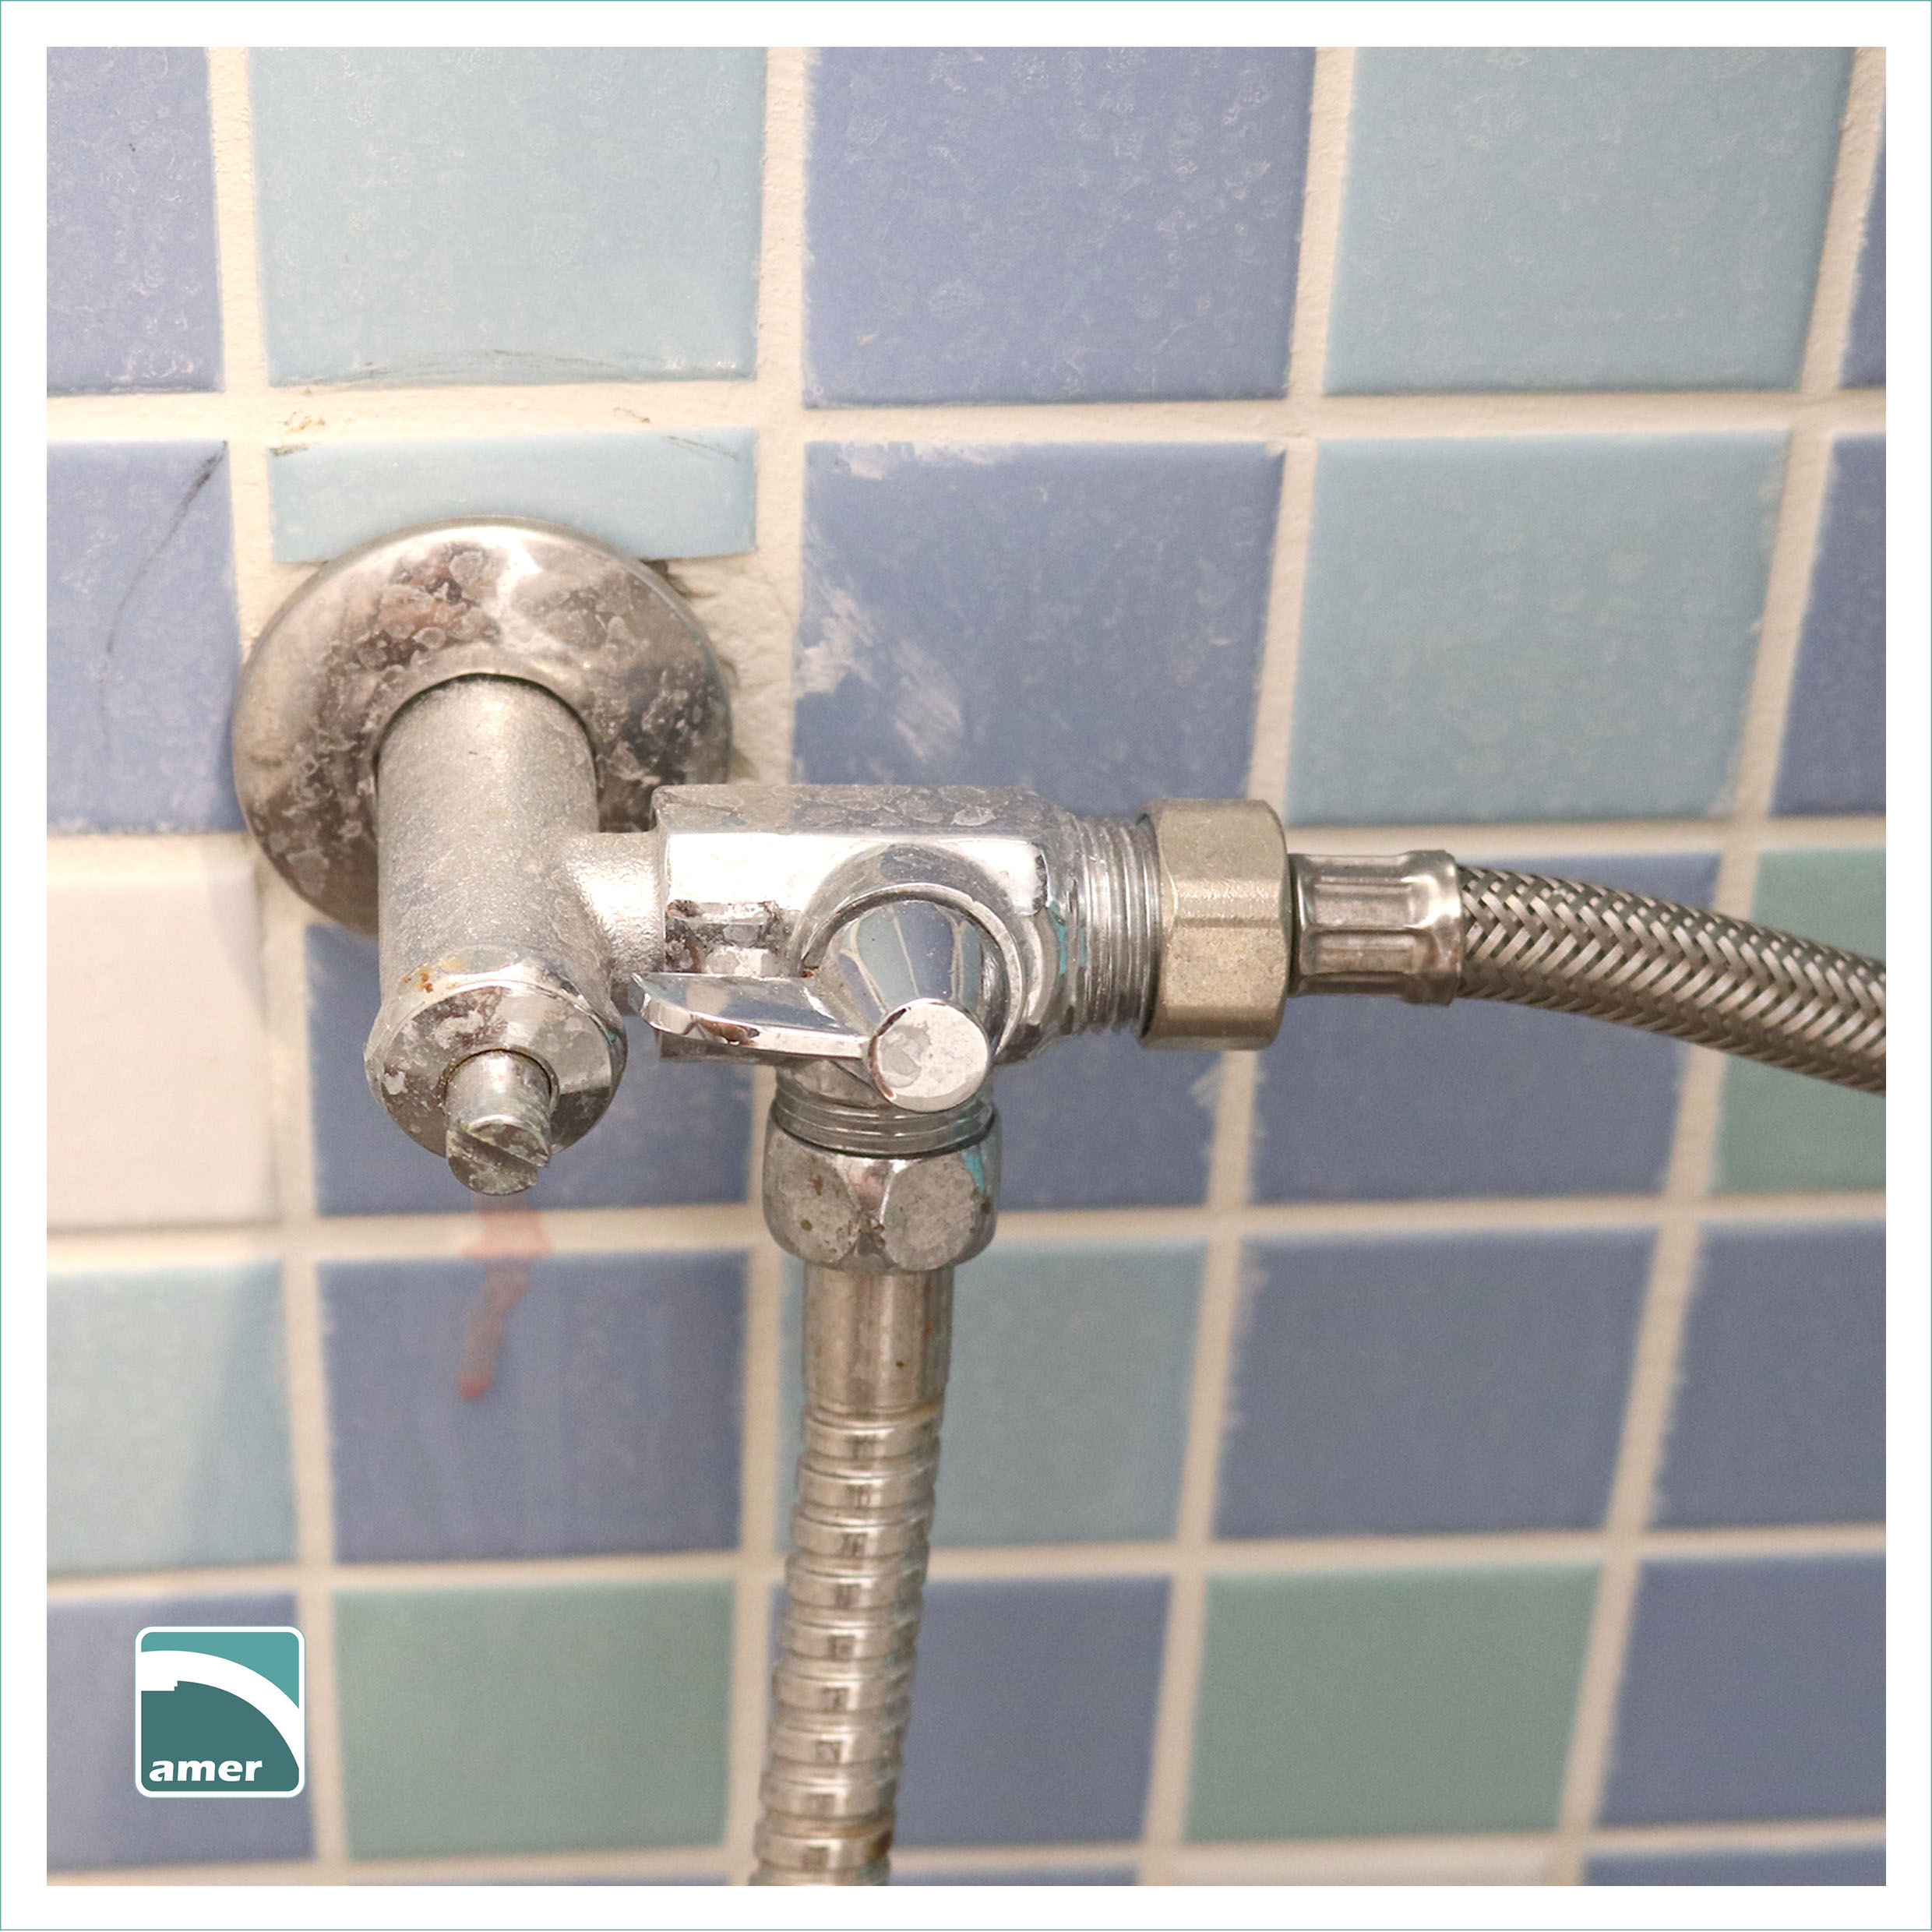
Step 1: Turn off the water
In most cases, you will find a shutoff valve on the wall behind or beside the toilet. There are different shutoff valves, but the function is the same—switch on and off the water. Here, switch off the water. Then, flush the toilet to drain out all the water in the toilet tank and bowl.
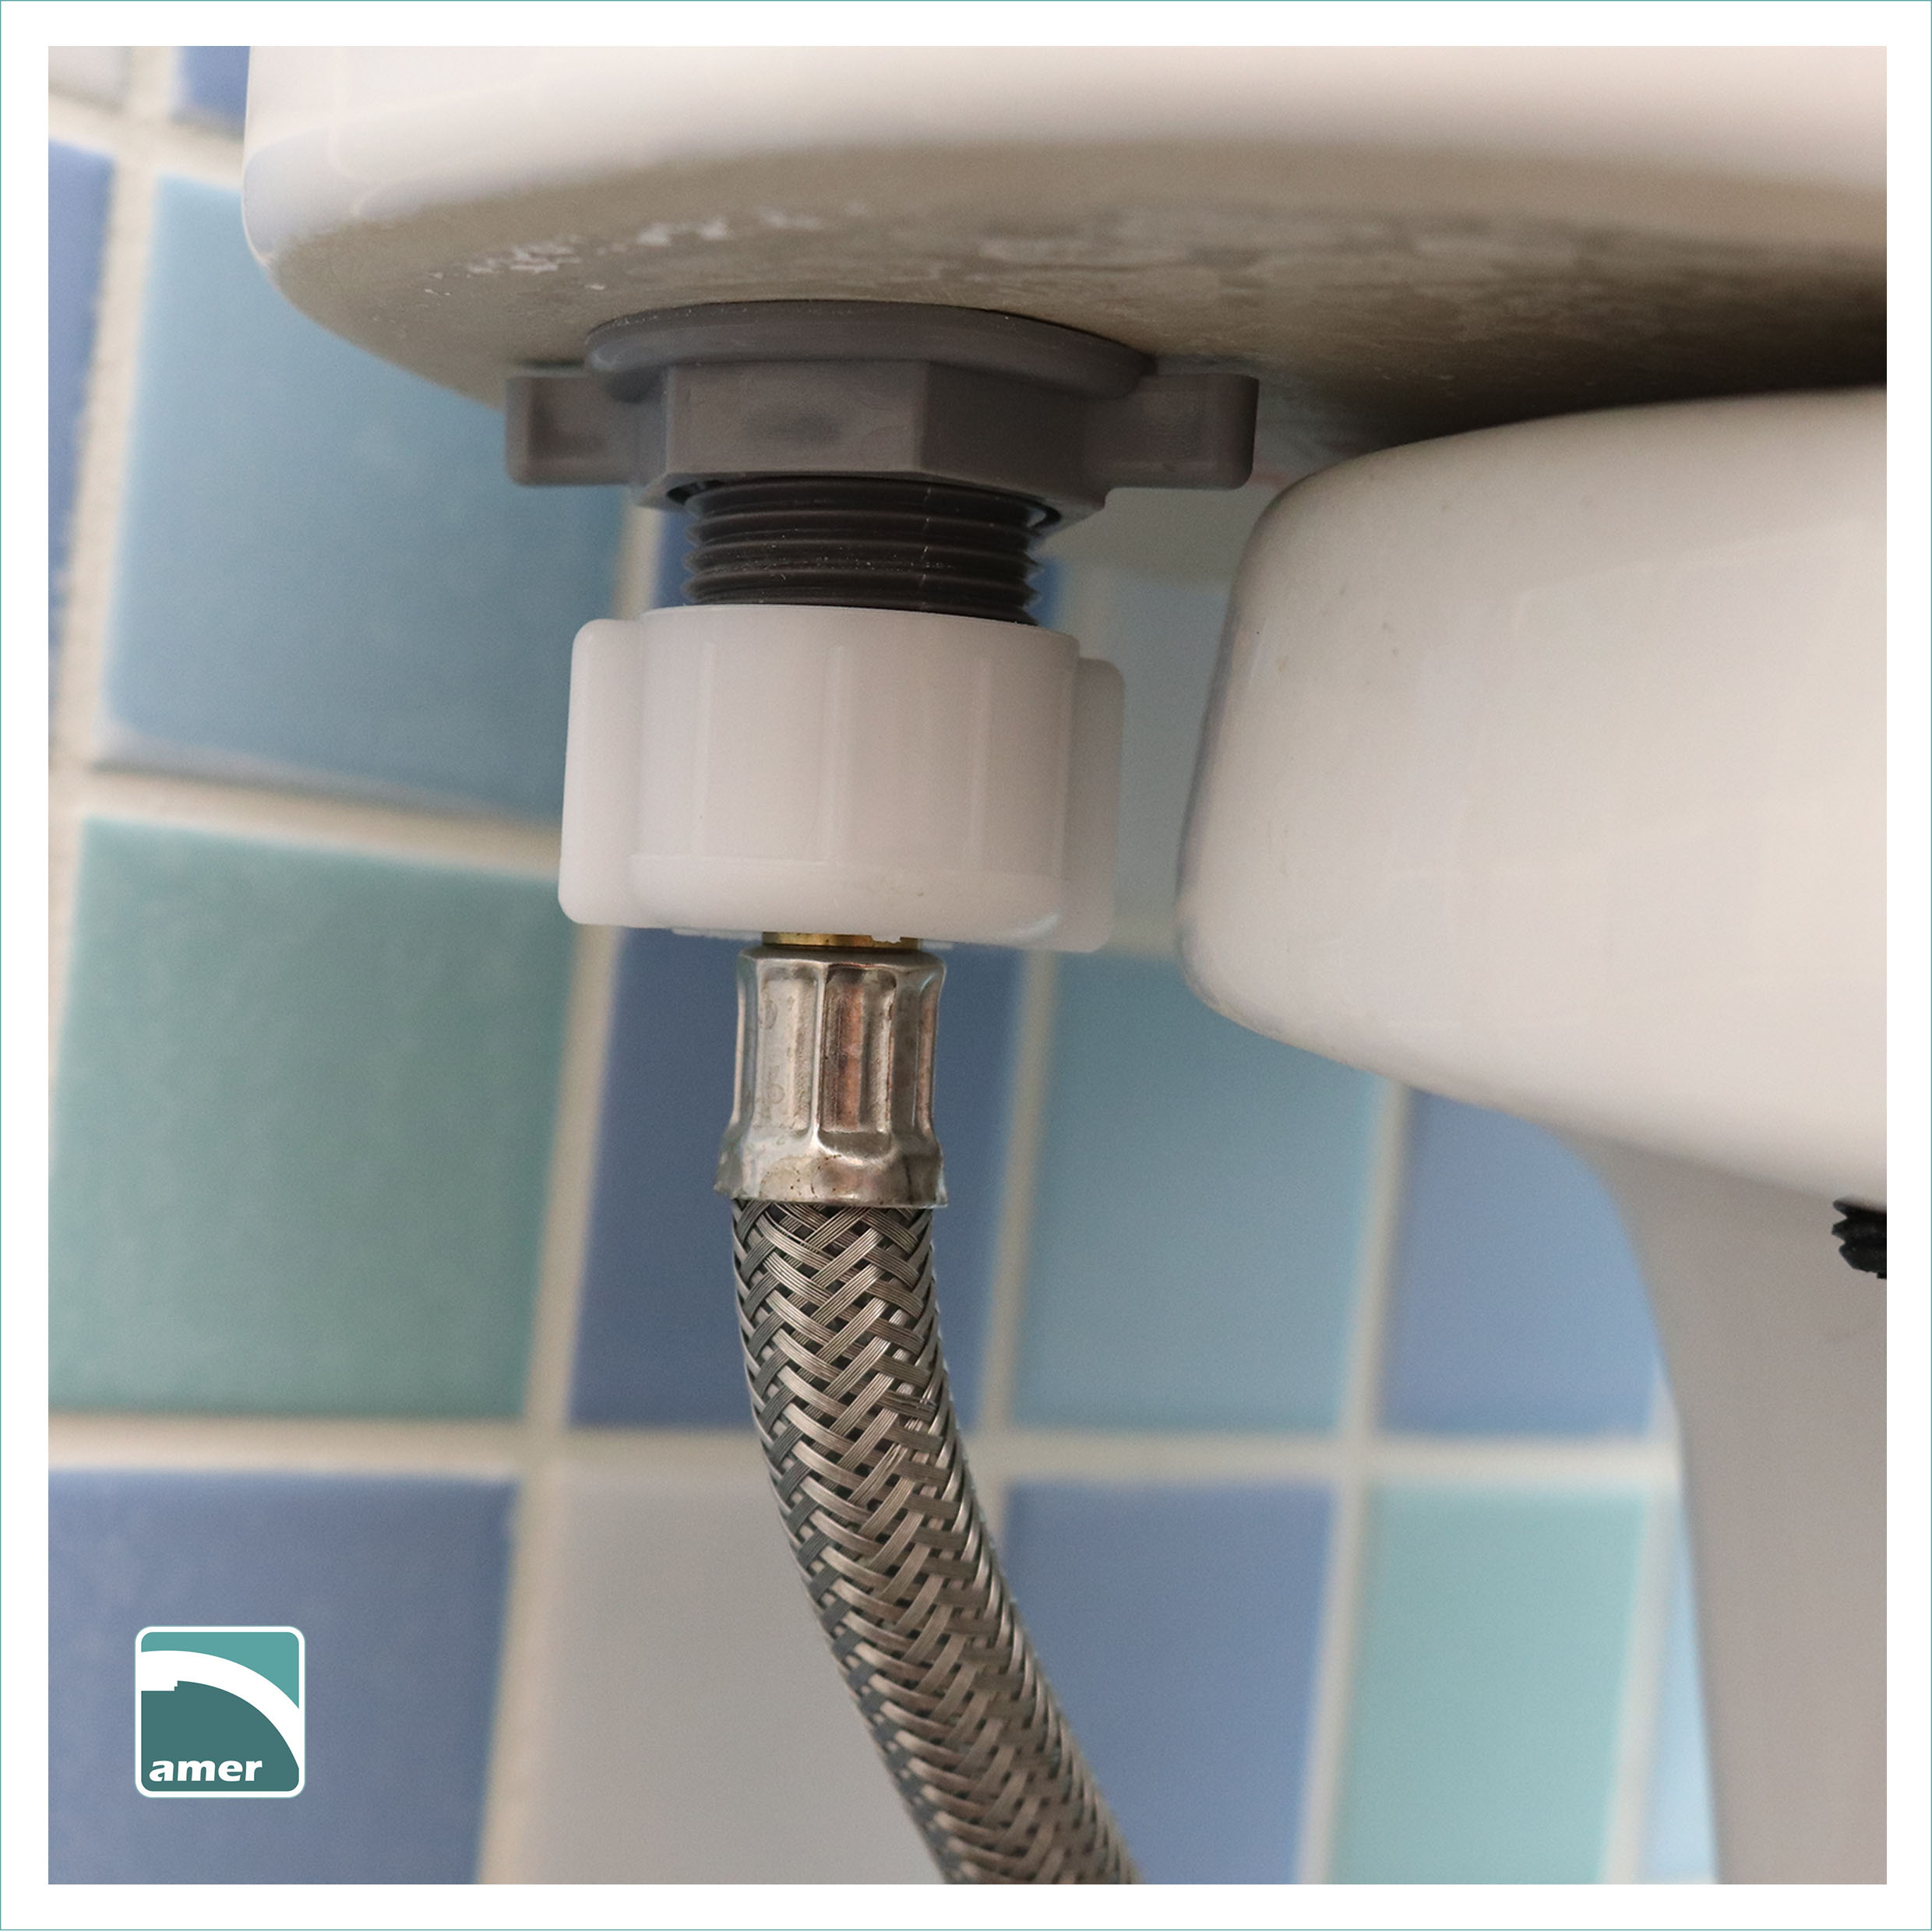
Step 2: Unscrew the water supply line
The toilet water supply line usually has a 7/8” B.C. plastic nut screwed on the fill valve (sometimes brass nut). Unscrew it after switch off the valve. You will need a bucket here to hold the remaining water in the water supply line. Better to keep the floor dry.
Step 3: Unscrew the tank bolt
In most cases, the metal nuts are corroded and welded on the bolt. If it is a plastic nut, it will also stick on the bolt due to the scale. Spray some lubricant on it and grab a plier or wrench to unscrew it. Then, remove the tank from the bowl carefully.
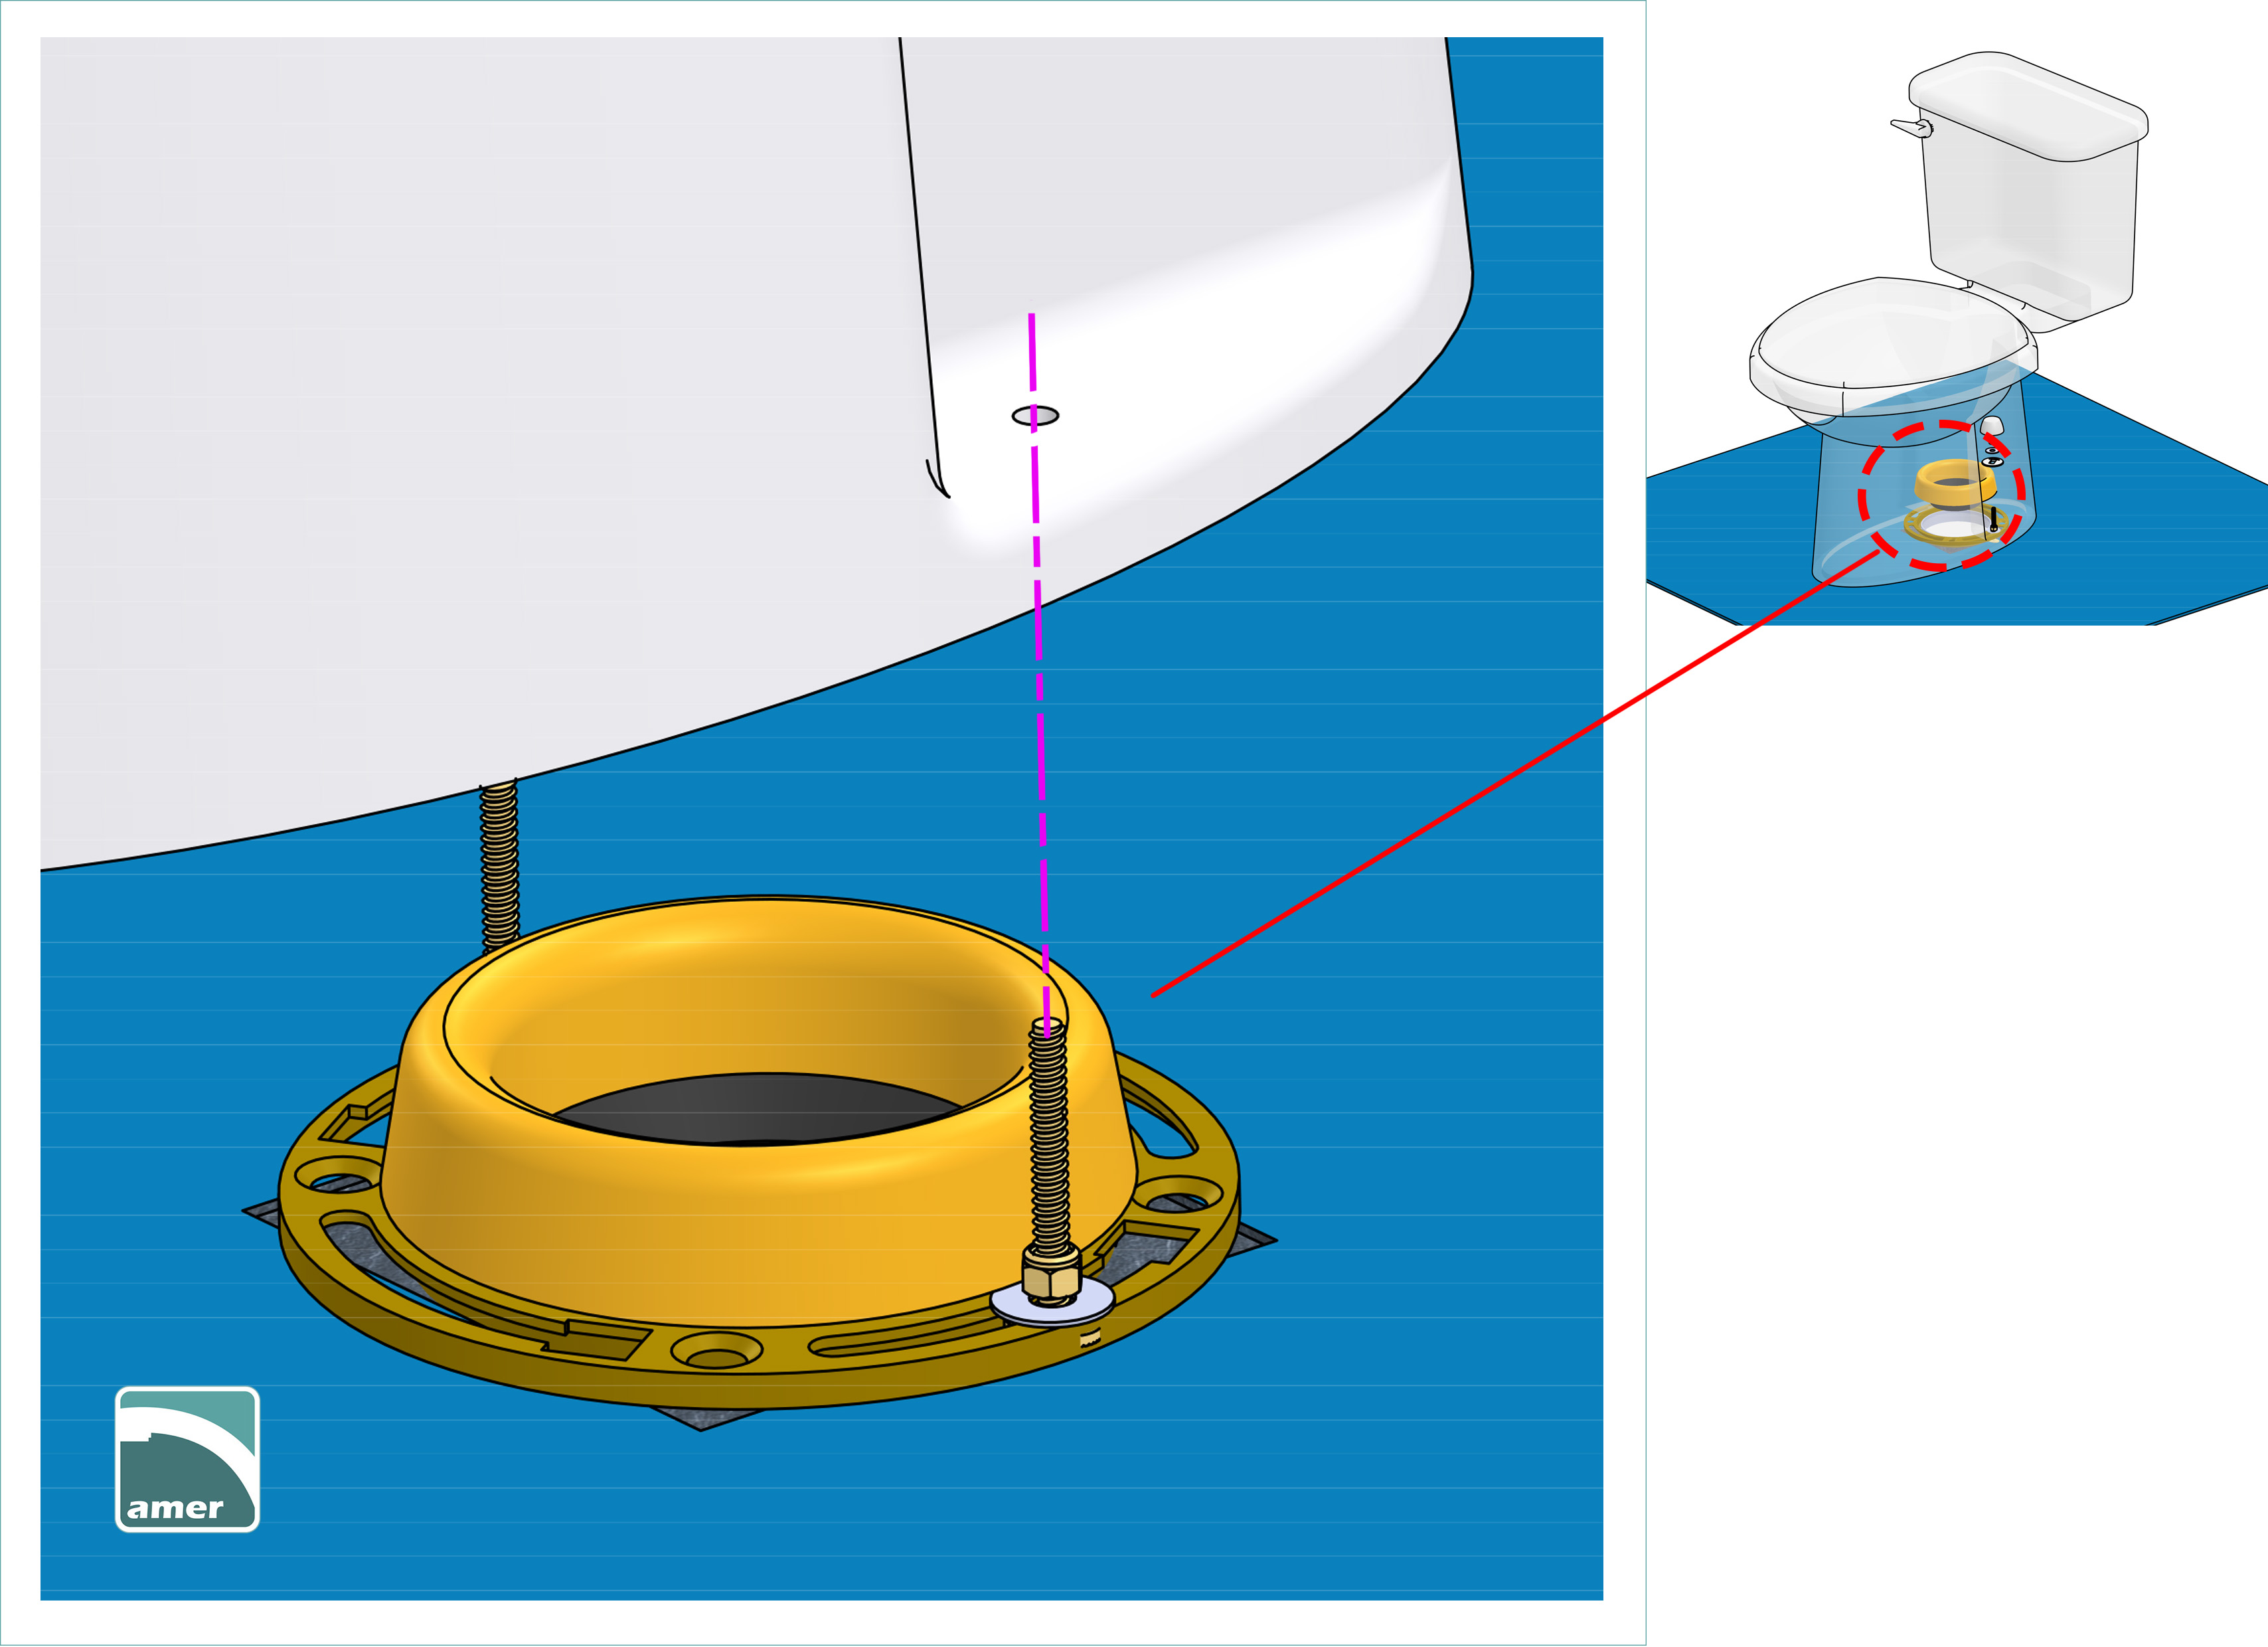
Step 4: Unscrew the closet bolt
Remove the floor bolt cap. Unscrew the nut with an adjustable wrench or try to create enough space and cut the bolt with a hacksaw. Remove old caulk around the base of the bowl. You can use the putty knife to remove it.
Step 5: Stuff the drain opening
Find a piece of rag and stuff it into the PVC pipe so that you can prevent rubble or hardware parts from falling in. At the same time, this also prevents the odor from the sewage flooding your bathroom. Scrap off the remaining wax around the drain opening and wipe away the remaining.
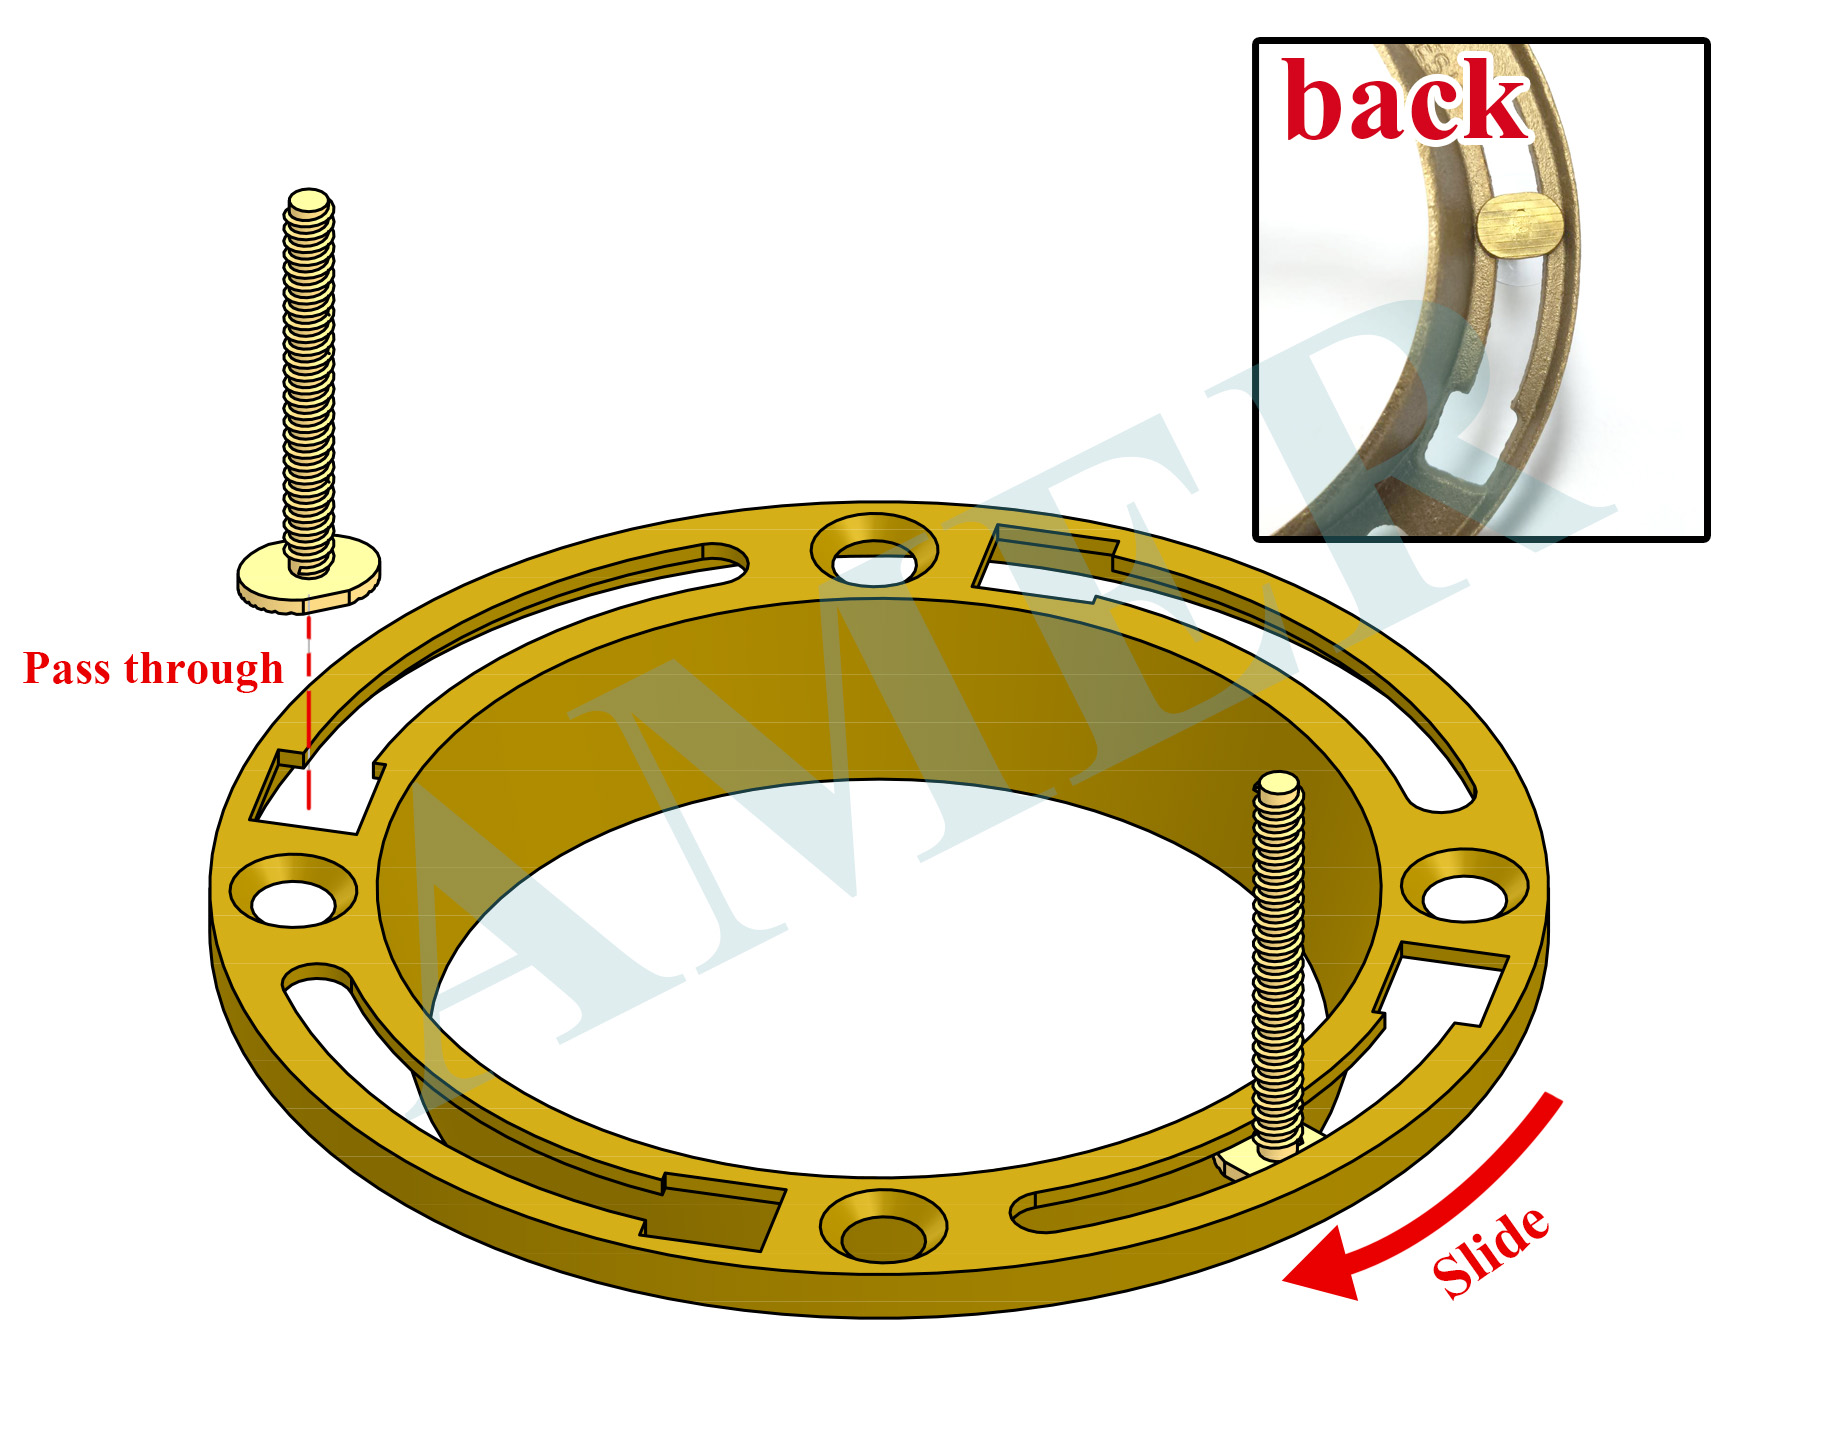
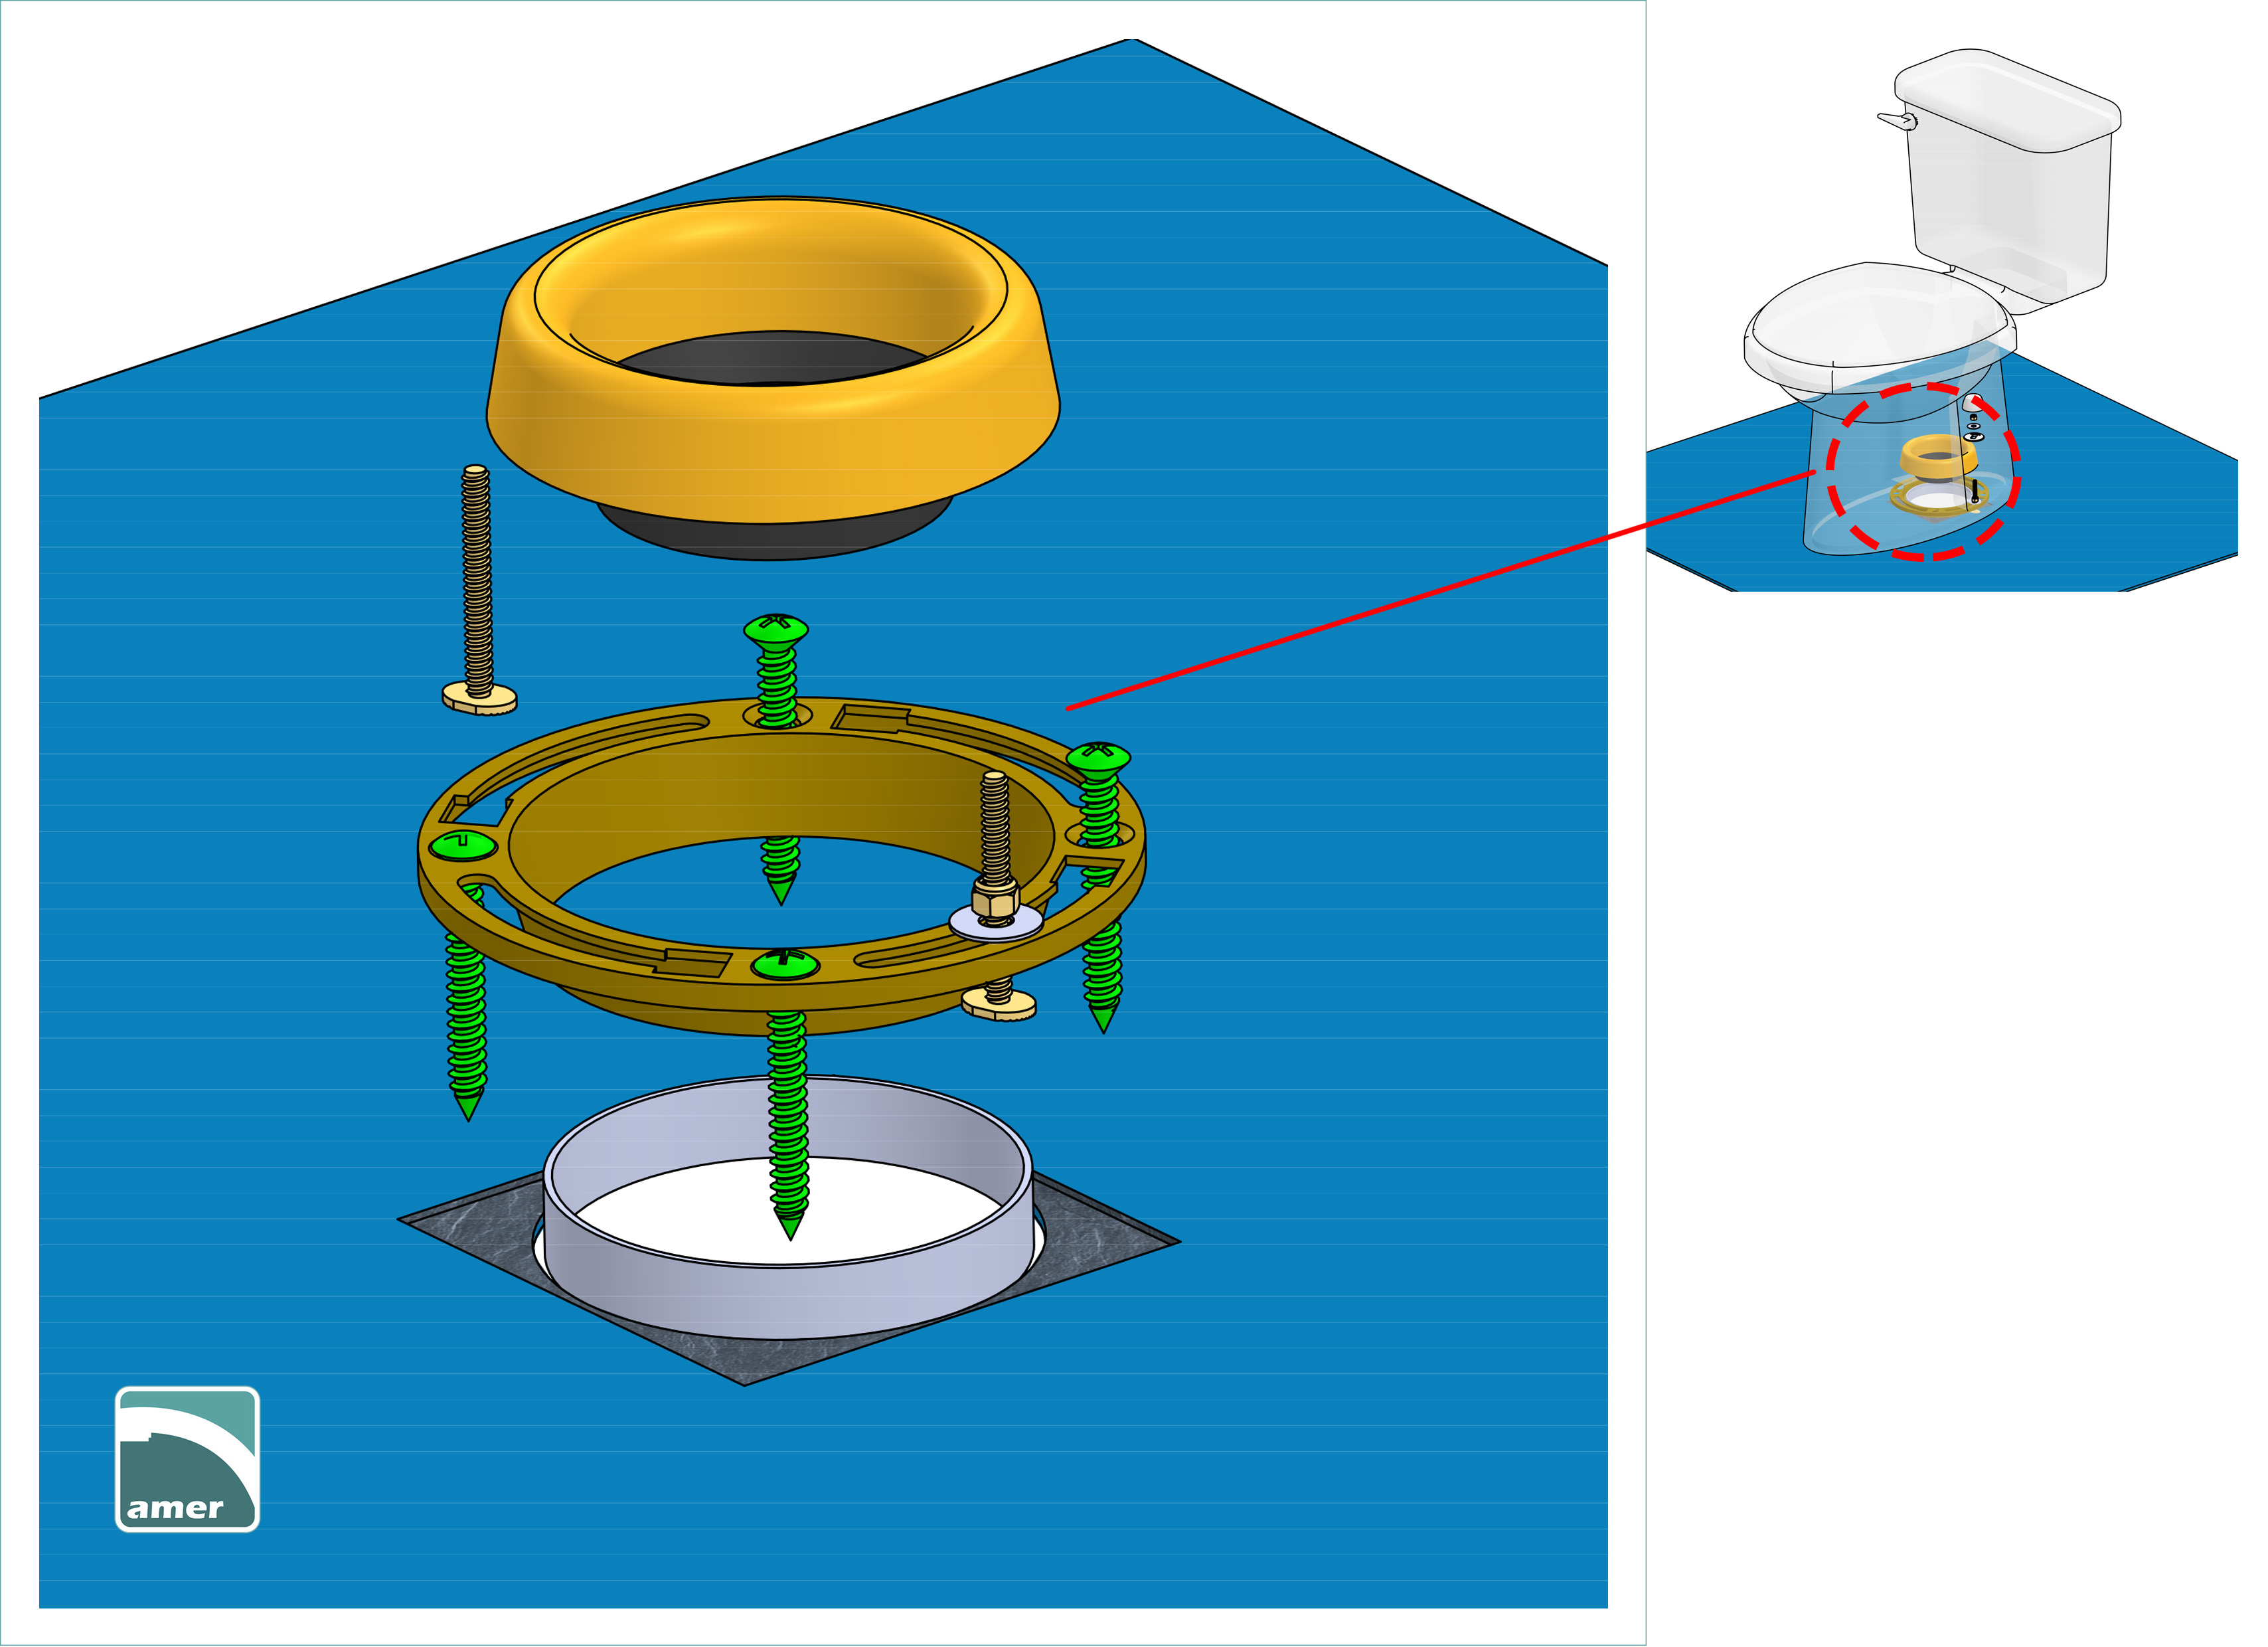
Step 6: Inspect/replace the old flange
Inspect the condition of the old flange. If it is cracked, replace it with a new one or use a flange repair kit as you wish. There are usually 4 screws fastening the flange to the floor. Unscrew them with a screwdriver (use an automatic one). Insert and slide the closet bolt to the right position on the flange. Use (1) Nut and washer (2) Captive washer (3)Speed nut to fix the bolt on the right position. Then, place the new wax ring on the flange.
*If you only have two open nuts and two washers in your closet bolt set, you don't need to fix the bolt on the flange here. Just slide the bolt on the flange. But this will take more time to set the toilet bowl on the bolt.
Step 7: Install the toilet bowl
This is the most frustrating part in the installation process. Align the hole in the toilet base with the bolt and put it on. *If you are concerned about crushing the wax ring when missing the tip of the bolt, you can attach the wax ring to the bottom of the toilet before placing the bowl to the flange.
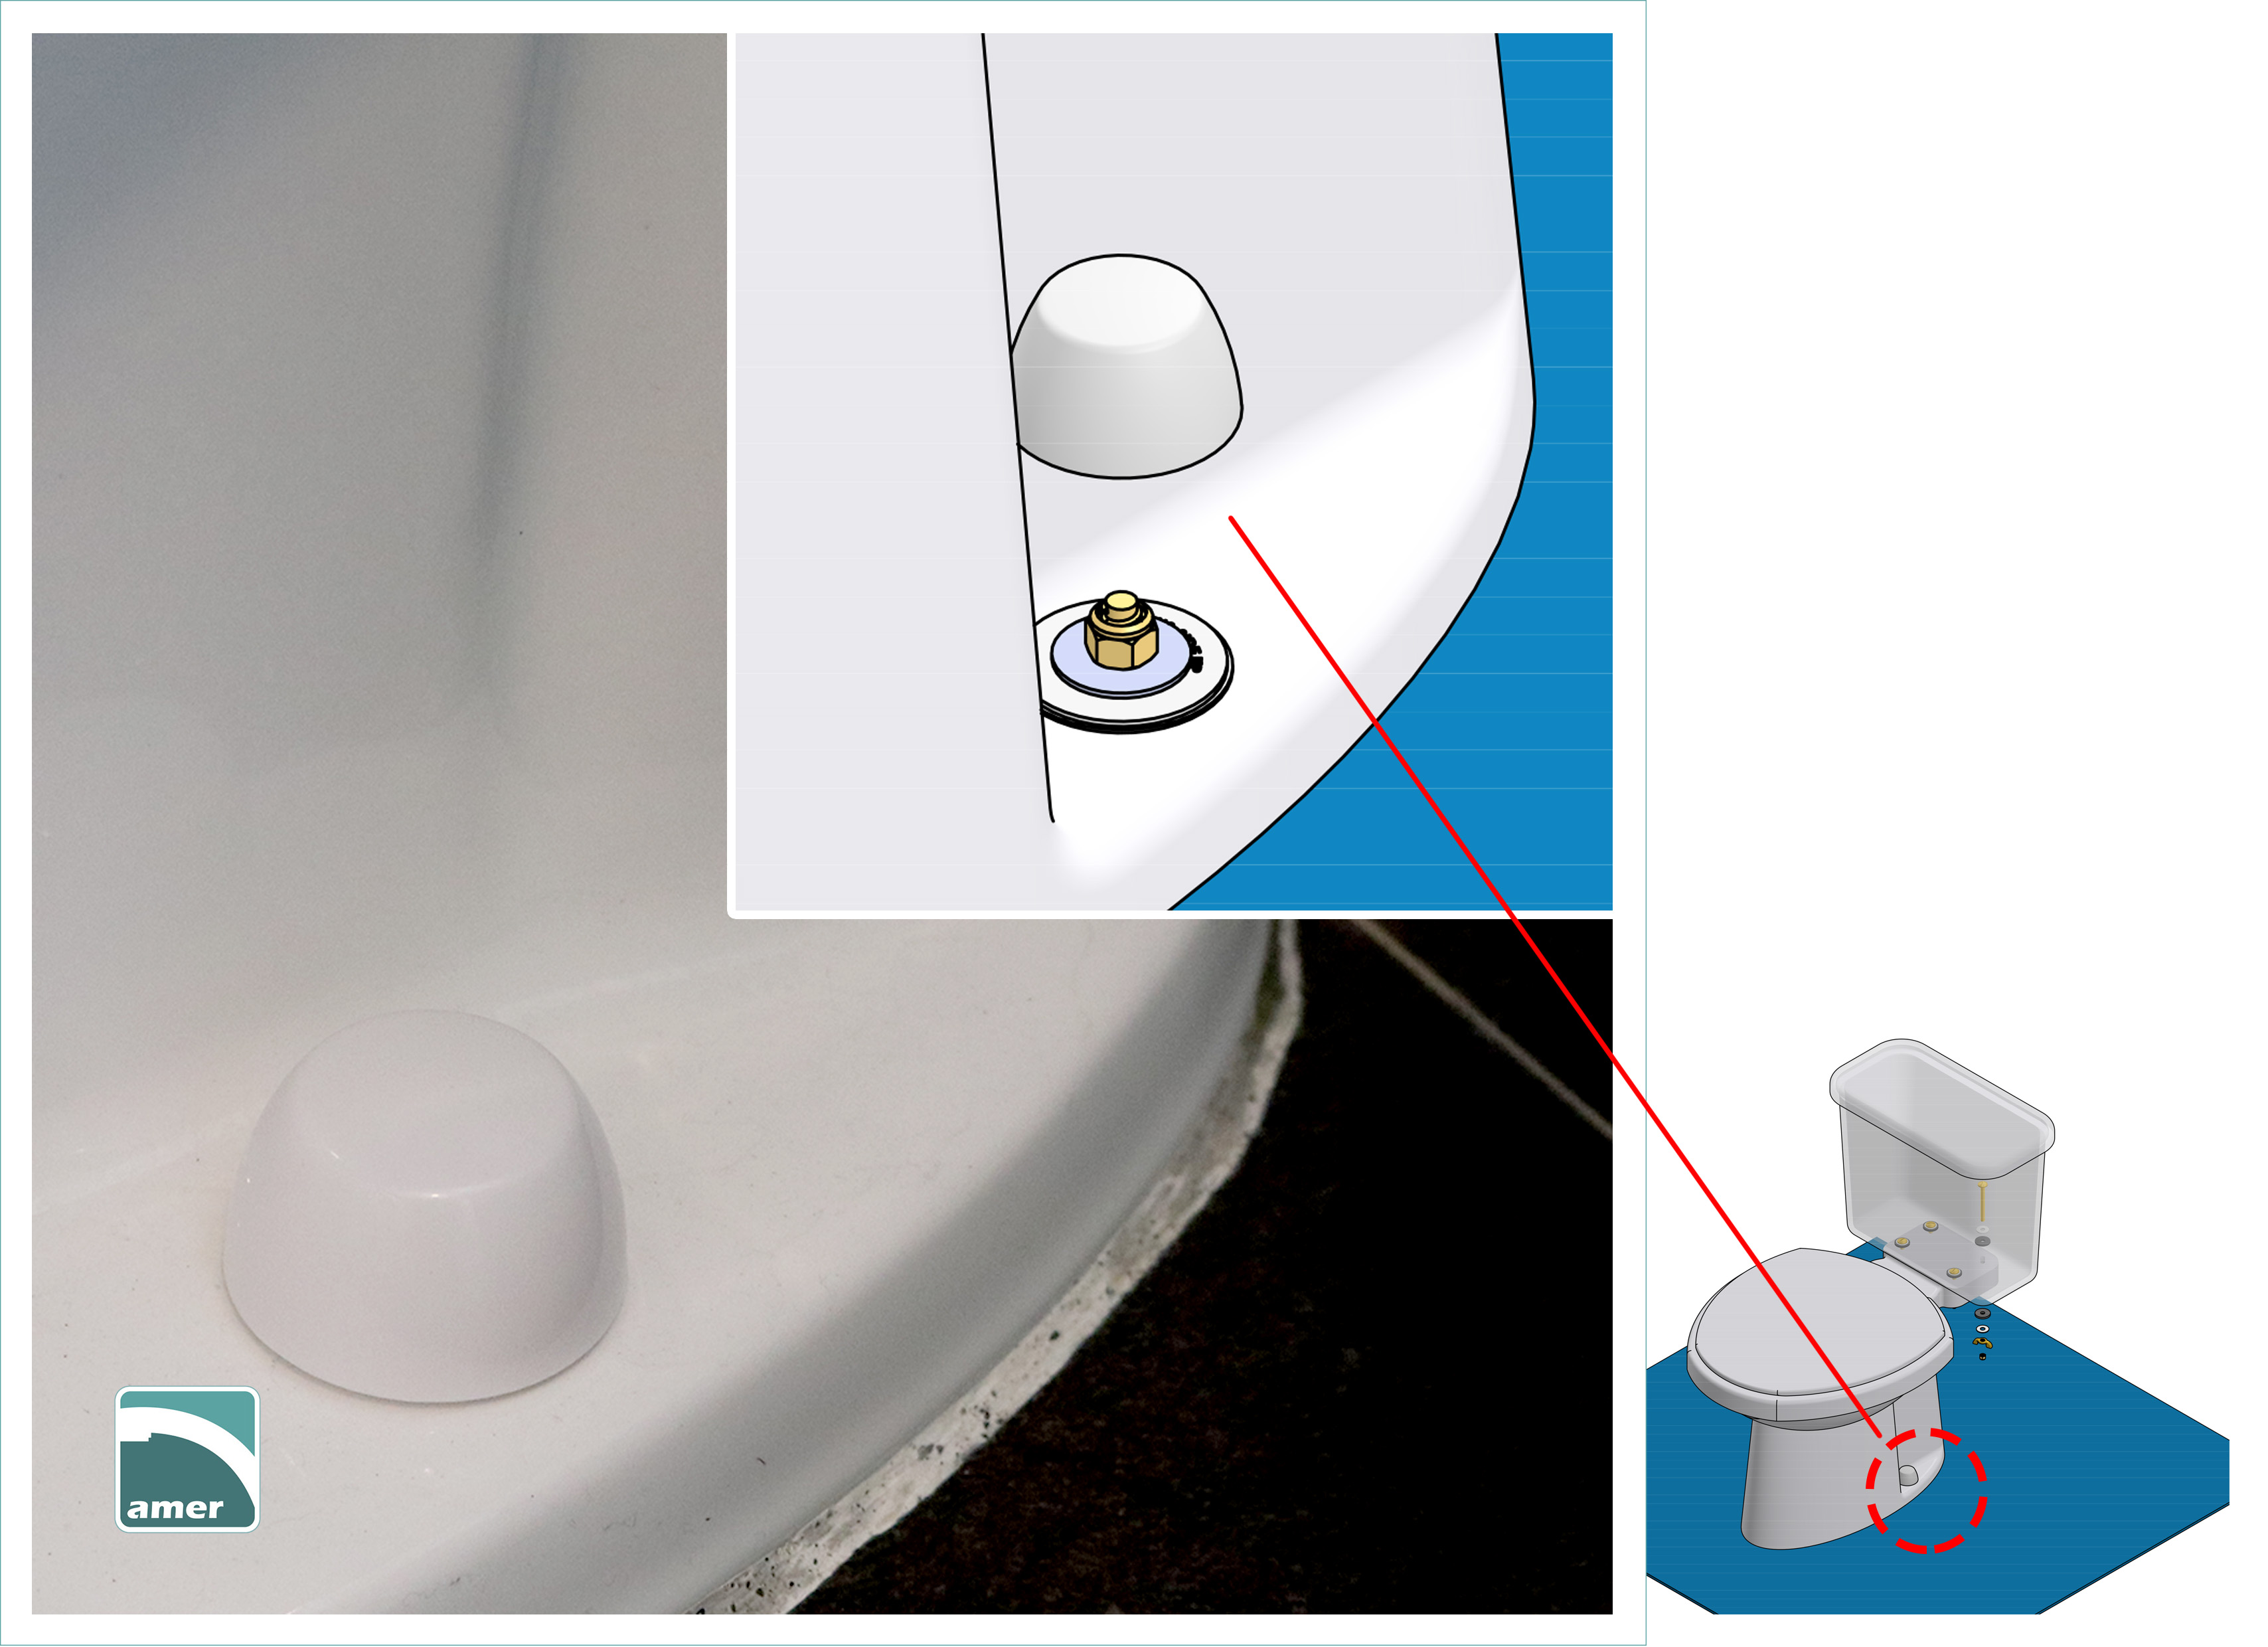
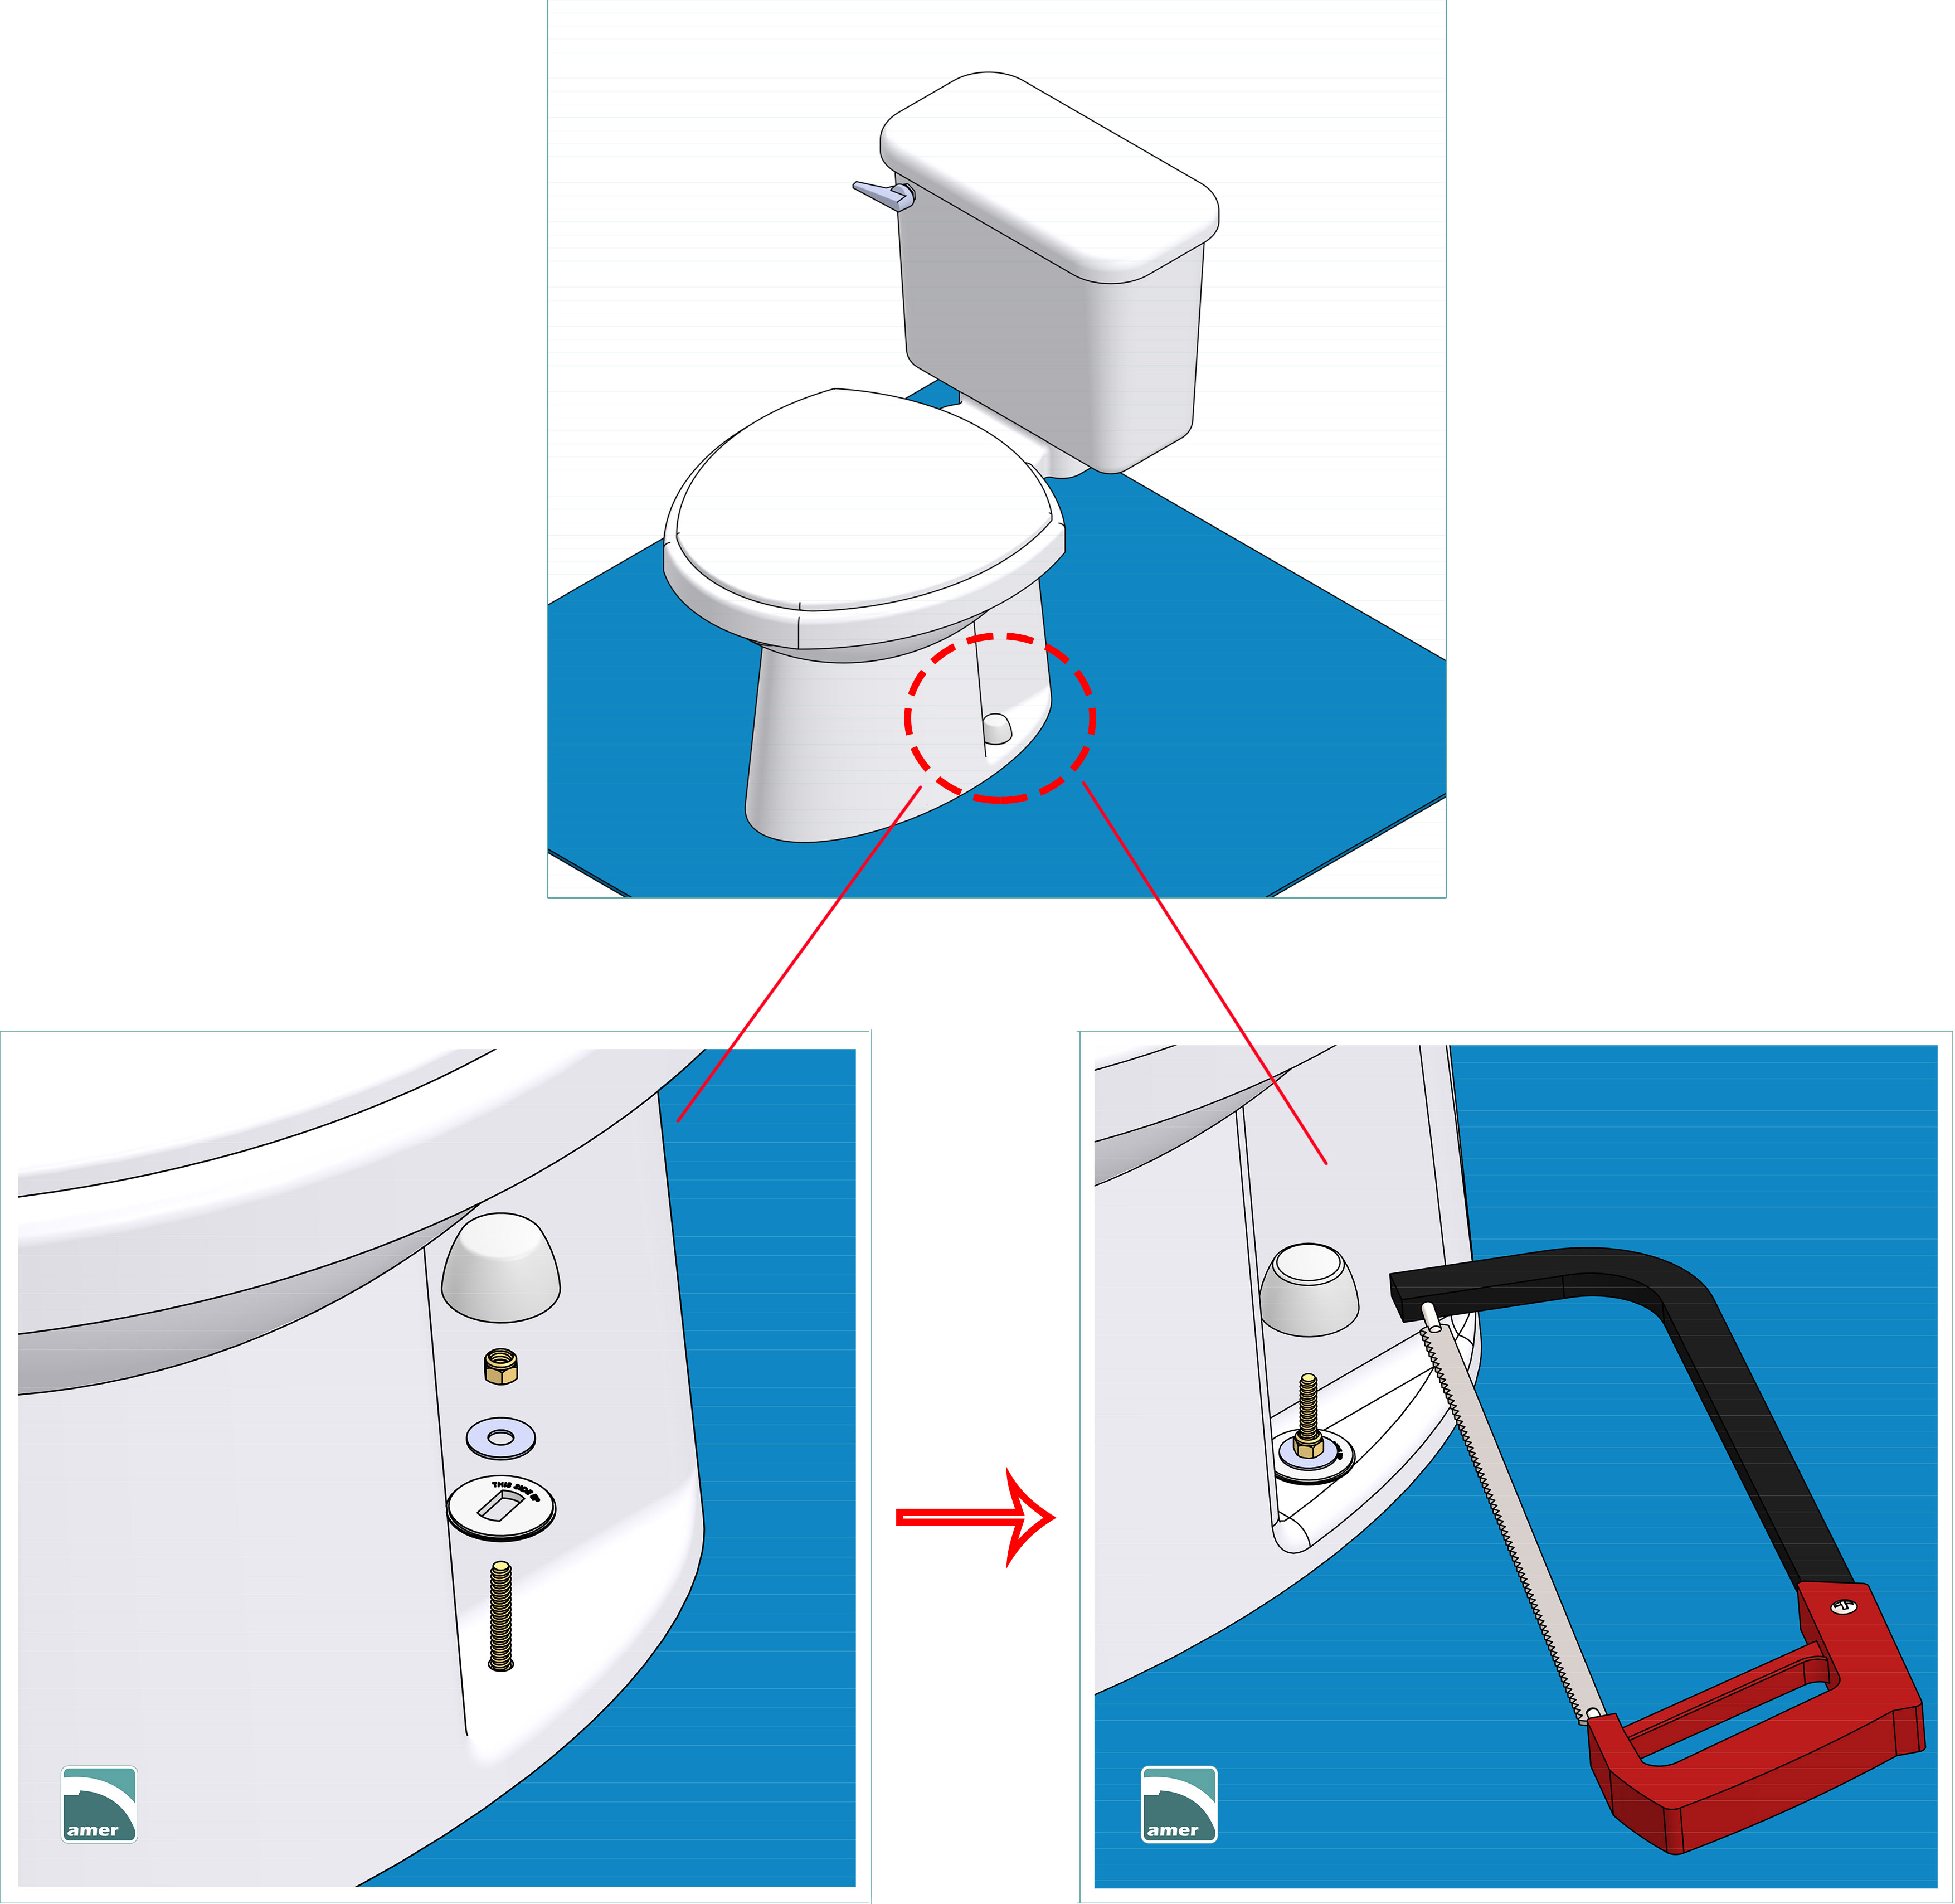
Step 8: Install the toilet cap
Below is the sequence of installing the parts of the closet bolt. First is the bottom of the cap. Note that the side marked “this side up” should face up. Then, slide the metal washer on the bolt and tighten the nut on it. *Do not over-tighten to bolt to crack the porcelain bowl. Grab a hacksaw to cut off the excess bolt. Press the cap on.
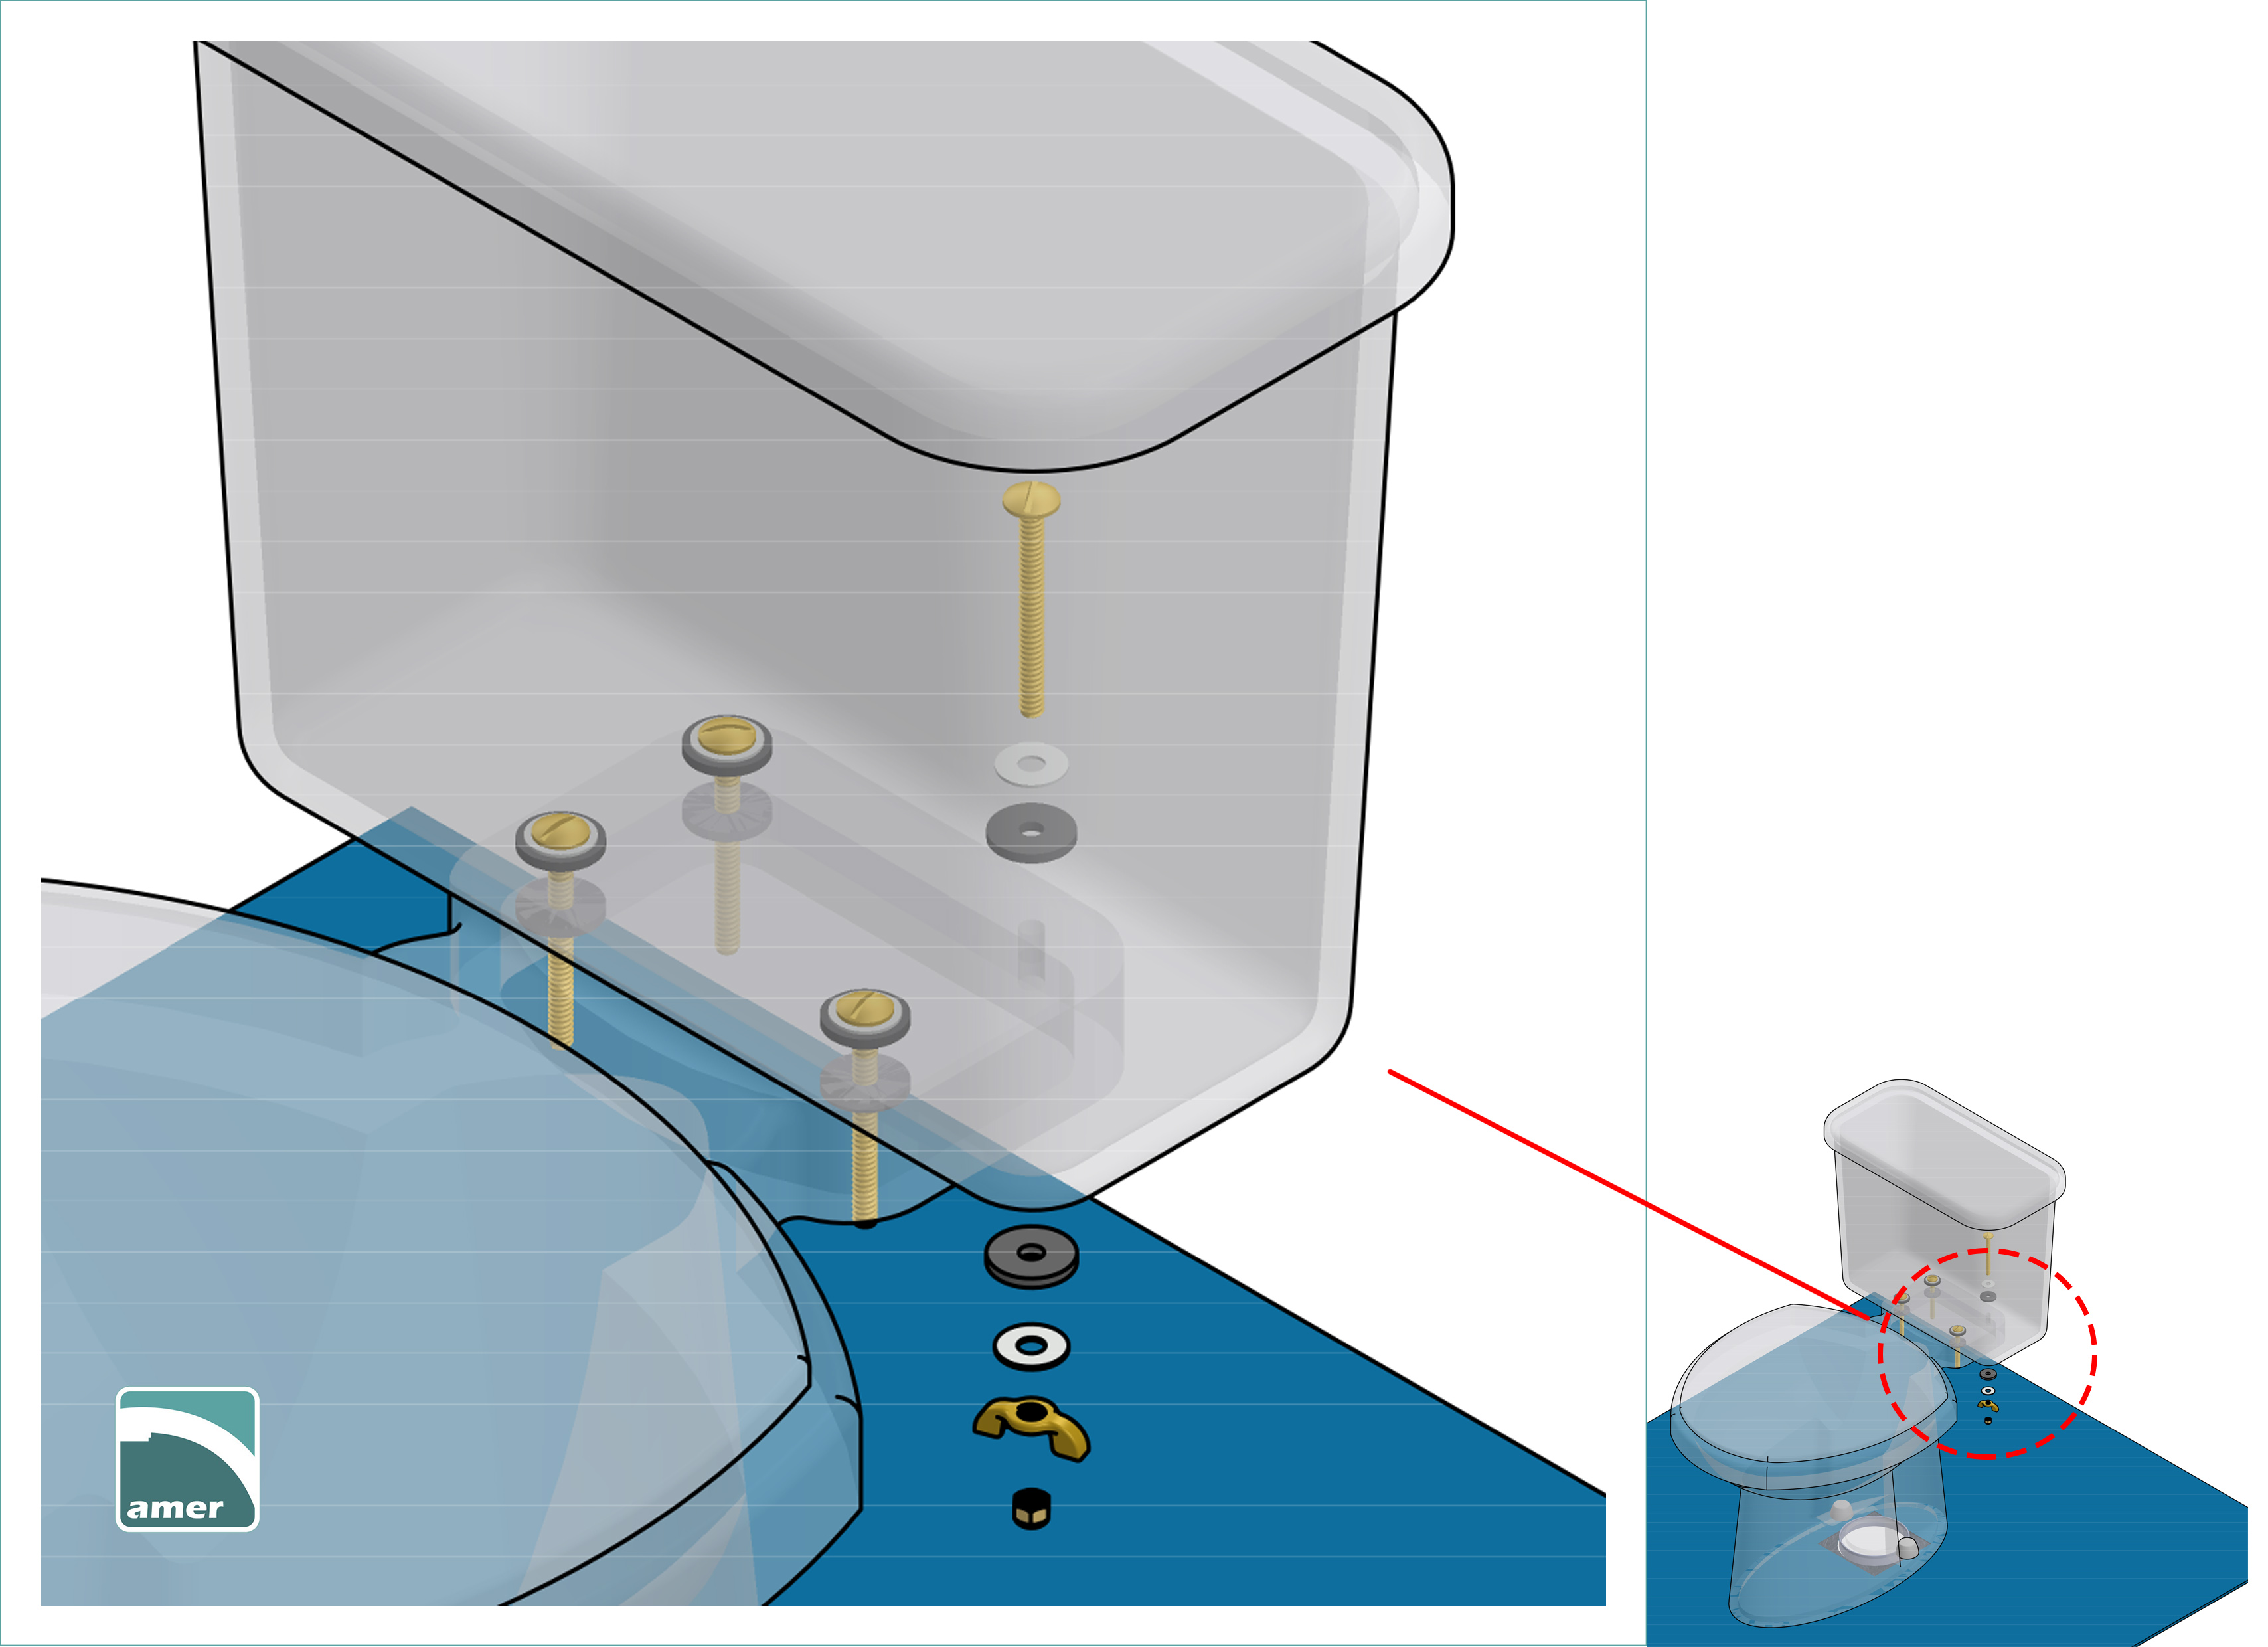
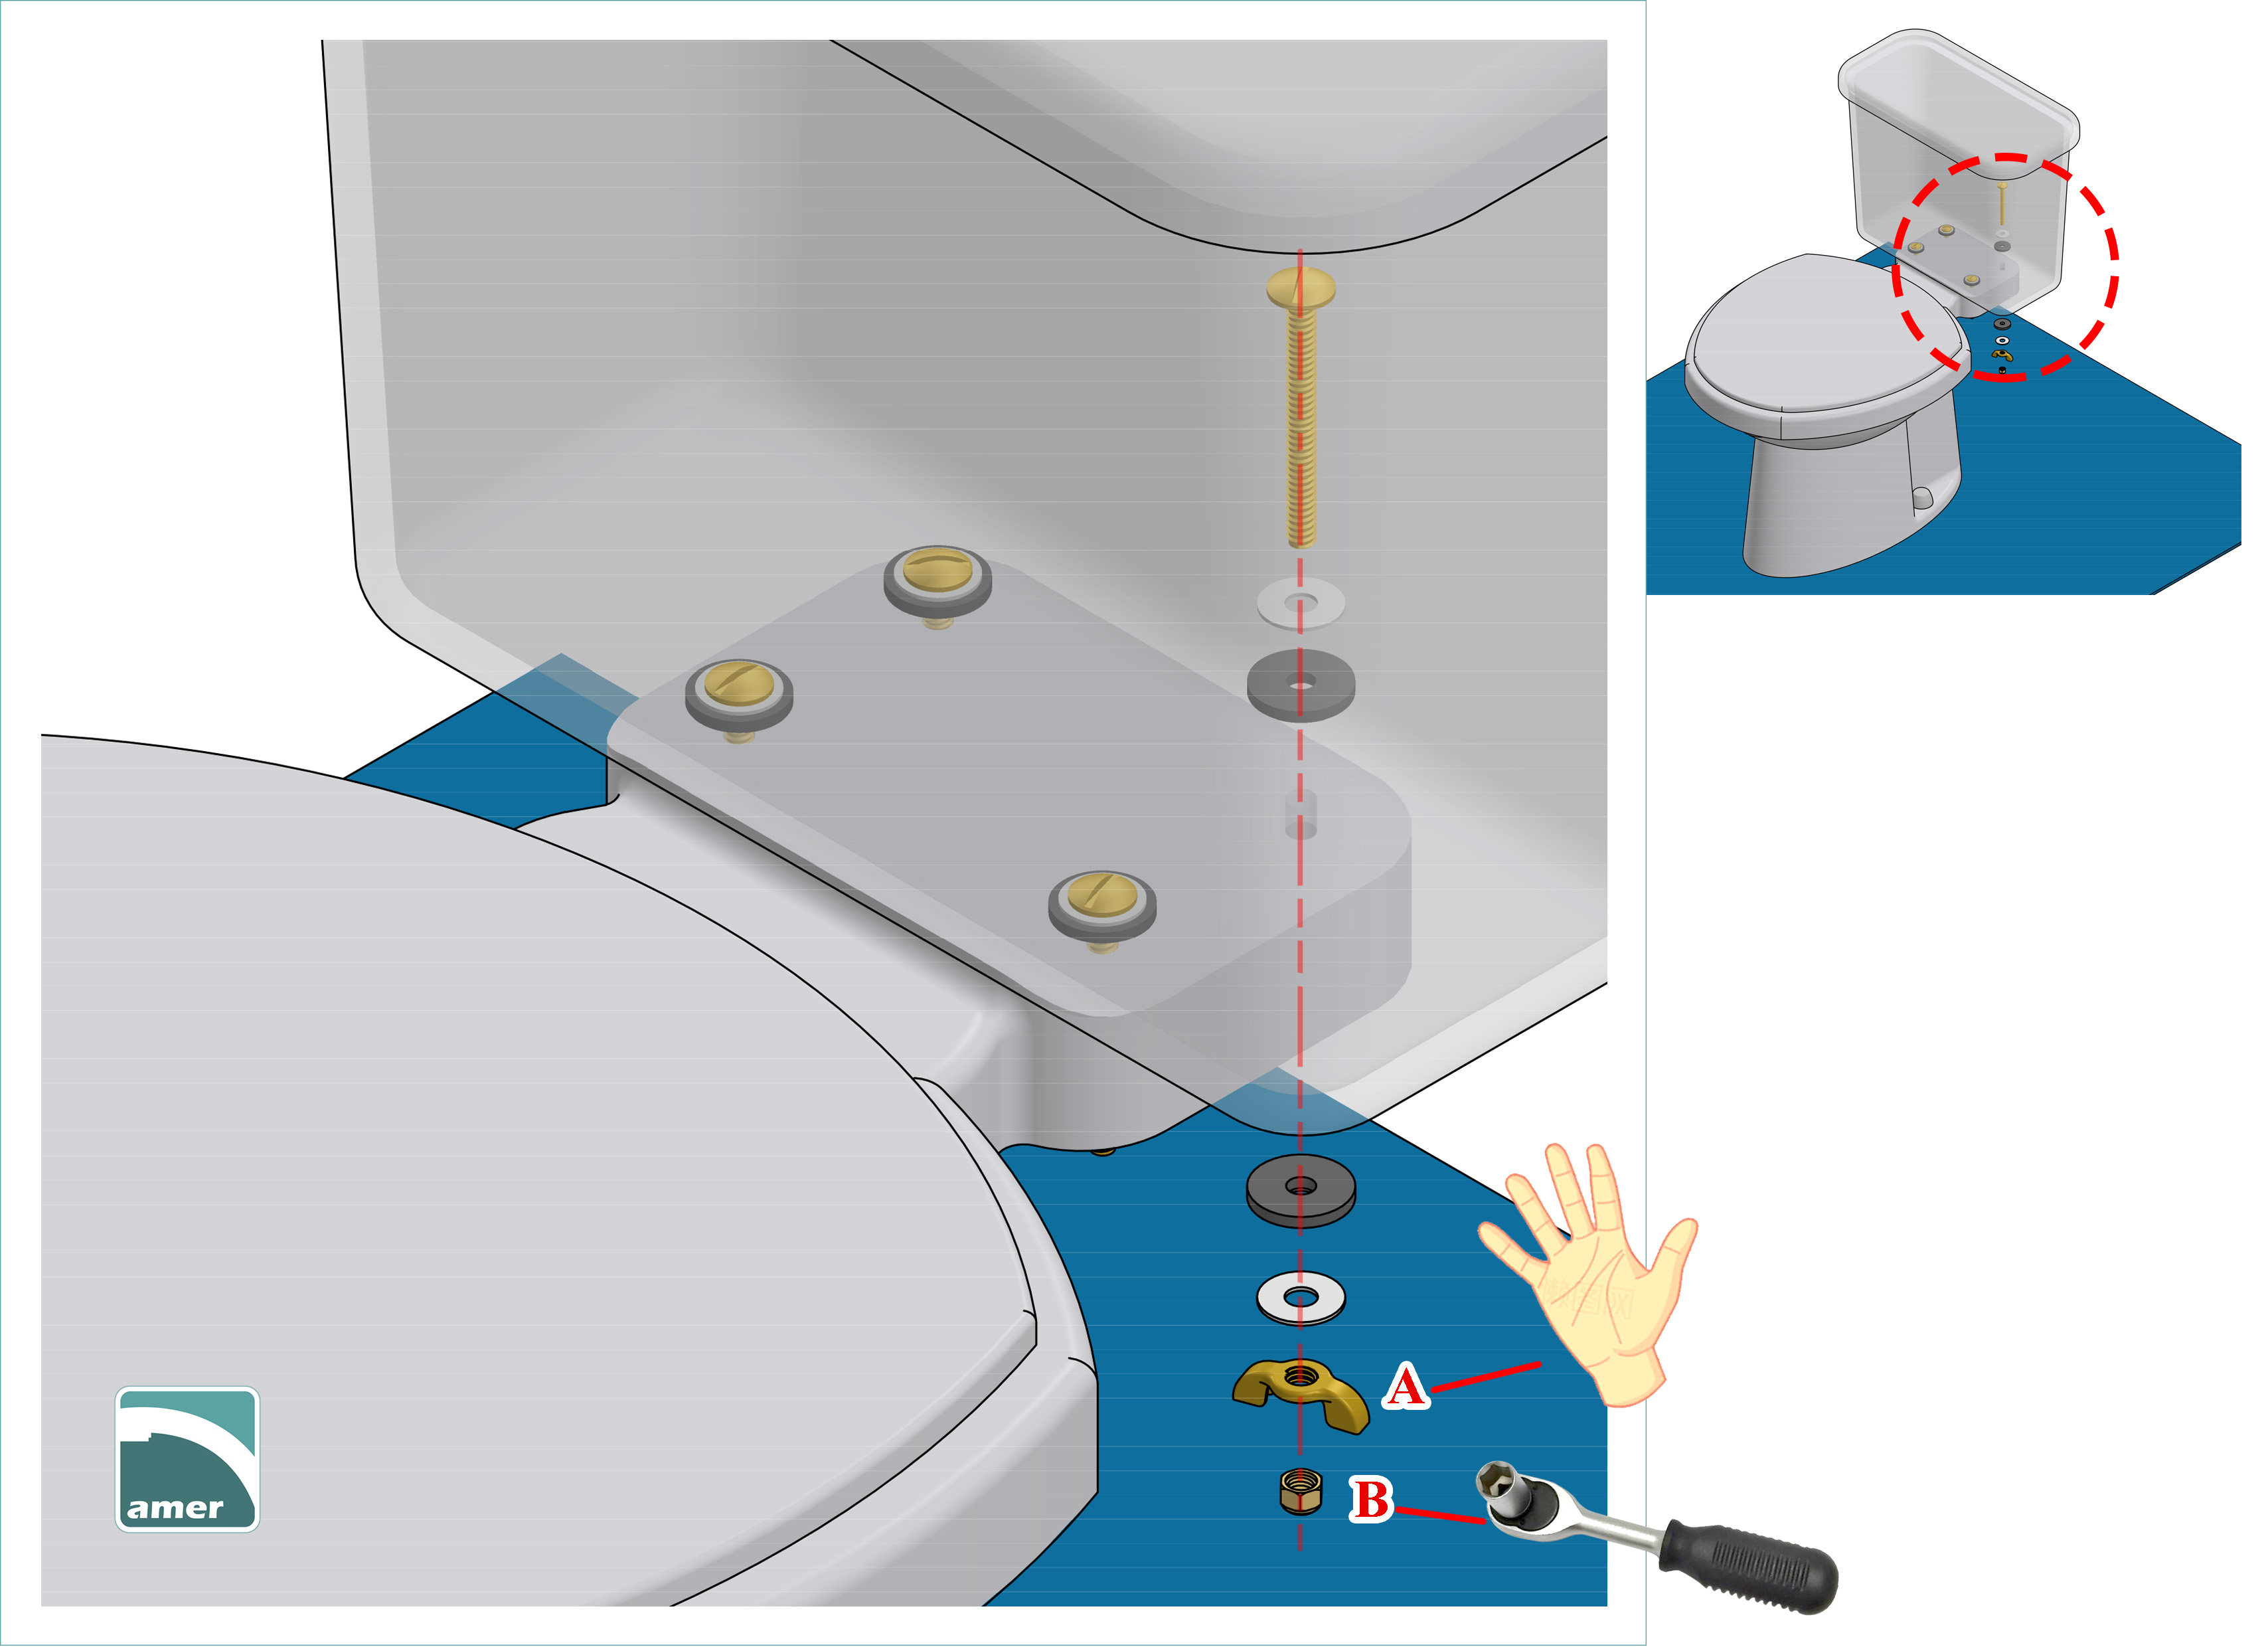
Step 9: Place the tank on the bowl
The picture below illustrates the way to install the tank bolt. First, insert the metal washer and rubber washer to the bolt. Then, insert the bolt through the tank to the base of the bowl. Put the rubber and metal washer at the base. At last, fasten either the wing nut firmly by hand Or the hex nut by wrench. Not to over-tighten to avoid cracking the porcelain bowl.